


arch
-
Posts
1,267 -
Joined
-
Last visited
-
Days Won
2
Content Type
Profiles
Forums
Events
Gallery
Store
Posts posted by arch
-
-
Anyone found a P1 style front splitter in 230 white around the Doune area

-
excellent thread mate, hat off to you for the work you've done and time spent writing it up for us all to admire.
Can I ask what clamps you are using for the FMIC pipework and where to get them? I'm having a nightmare time blowing hoses off at the moment with jubilee clips.
Cheers
I used Mikalor clamps and you can get them from any Pirtek branch, I used the one in Paisley
John Probably best if I hang onto it for now
-
CONT
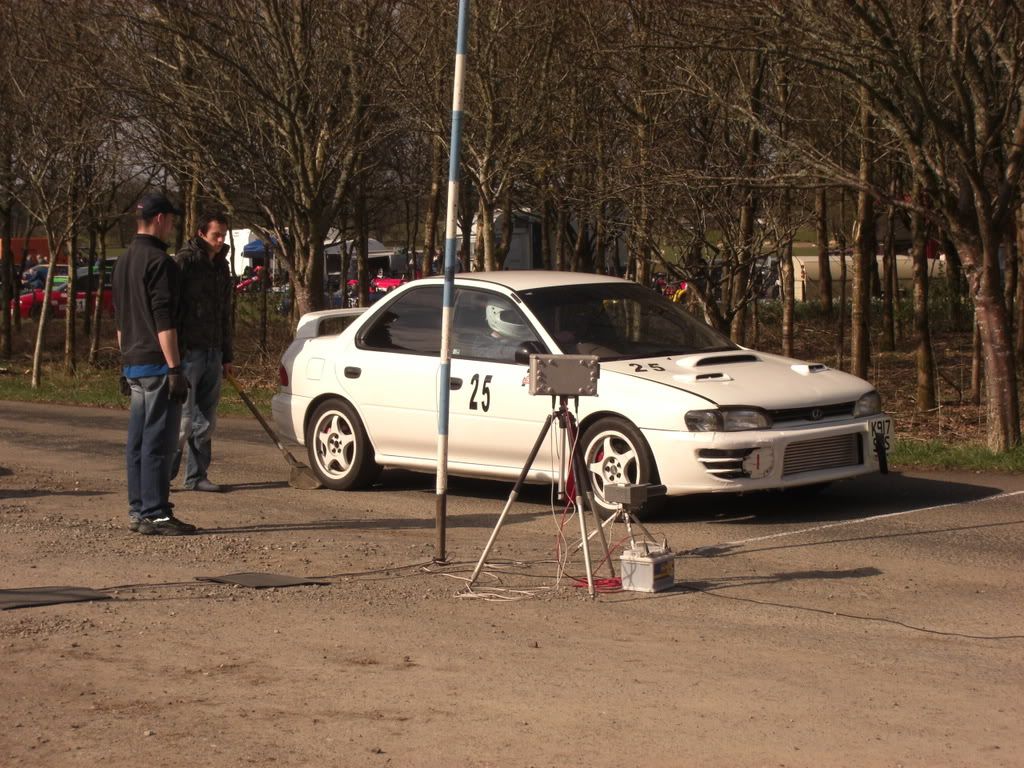
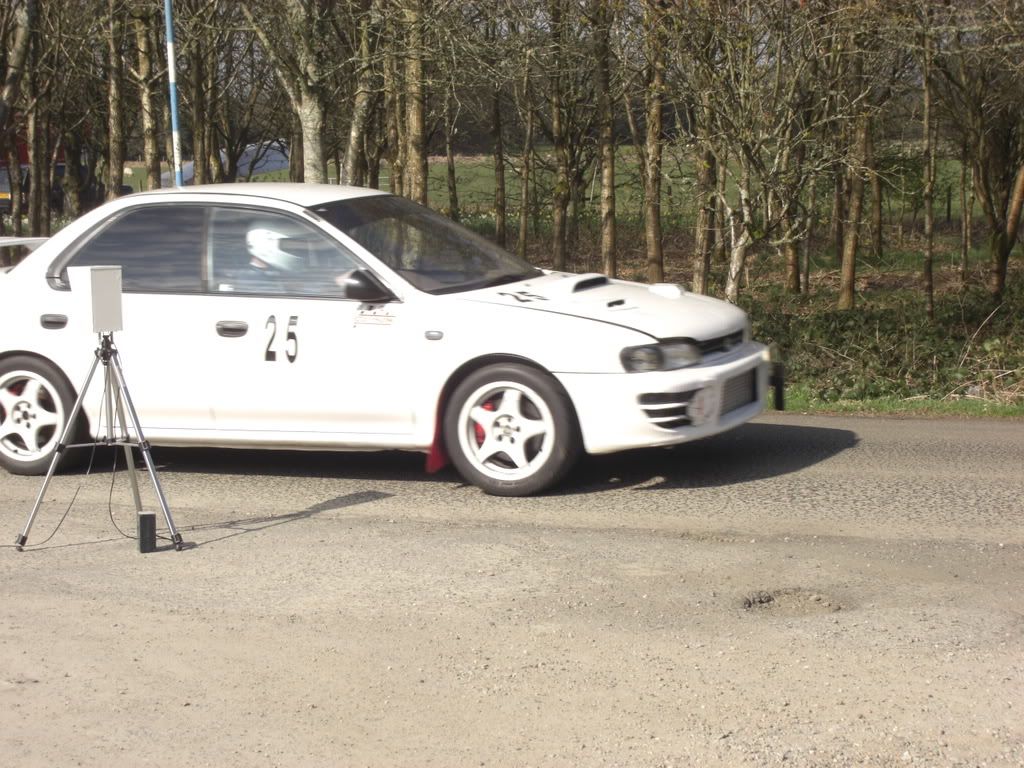
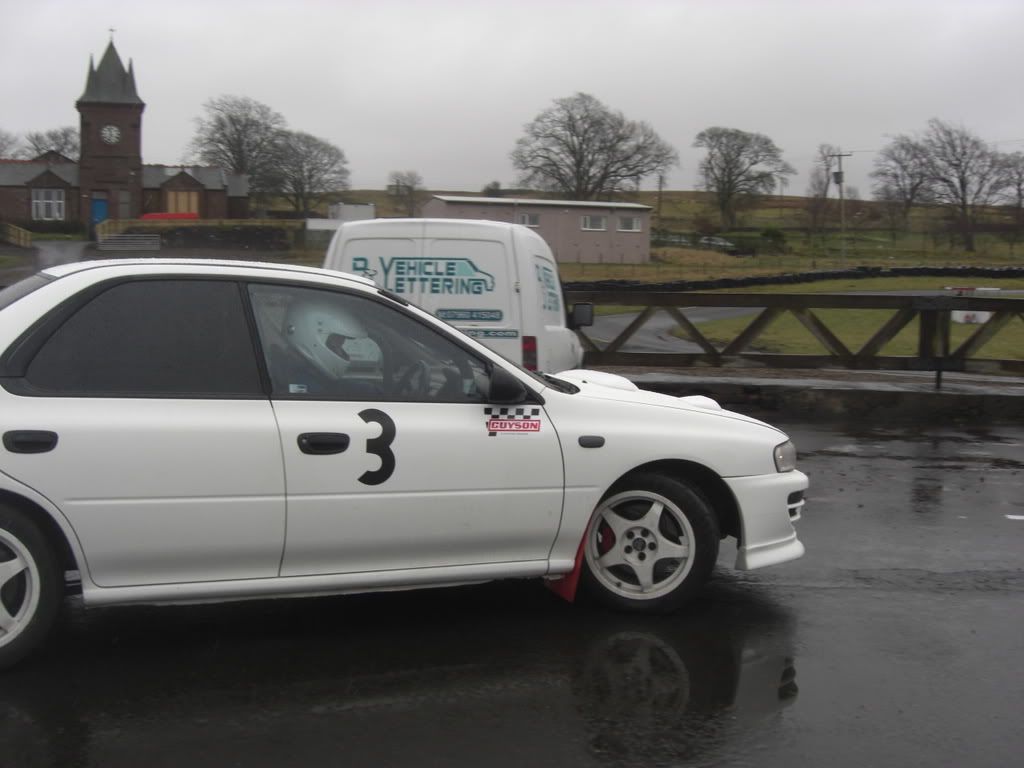
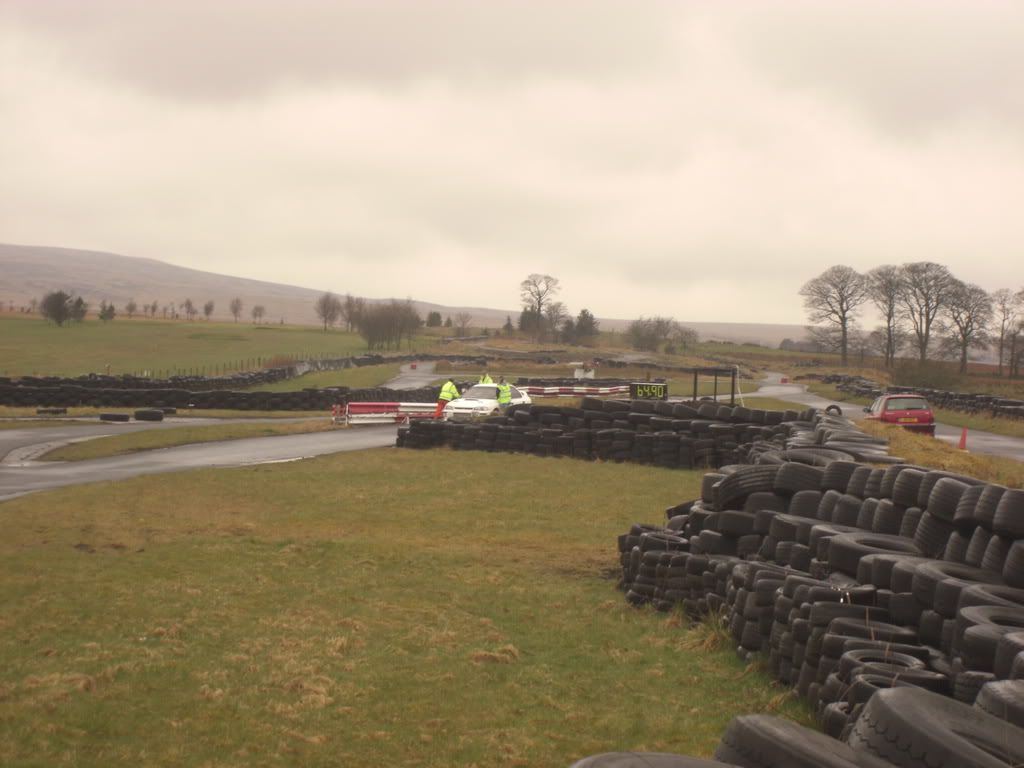
Well the next event on the calender was The Doune hillclimb, date was the 19th April, seem to remember that day for some strange reason!
I had been to Doune loads of times to watch John and had walked the track a few times but to be honest until you are faced with driving up it the actual width of the track does not fully register. I was well briefed on my first walk up the hill as a competitor by both John St and Graham Bremner another experienced campaigner. It was now beginning to dawn on me why this particular hill is both loved and feared!
Well off i went with two practice runs safely under my belt the first very tentative and the 2nd just tentative. A break for lunch brought a chance to walk the hill a second time before the first of the timed runs. I was feeling a lot more confident at this point and was looking forward to the main event. After some last minute advice I launched off the line into second and set up for the first corner, round it no bother took third gear and bang torque steered straight into the wall - ouch was my initial thoughts. The worst thing was I managed to get the car straight and move it to the next marshals post and get it turned facing back down the hill. I then had to wait around 45 mins while they rebuilt the wall and fencing at the corner all the time knowing that the car was damaged and that this was holding the whole event up. I am still unsure of why it happened but know it was my error. I either lifted while on the power with lock on or put the power down too early with the wheels not straight either way it was a bad decision

I managed to get the car down and then began to asses the damage.
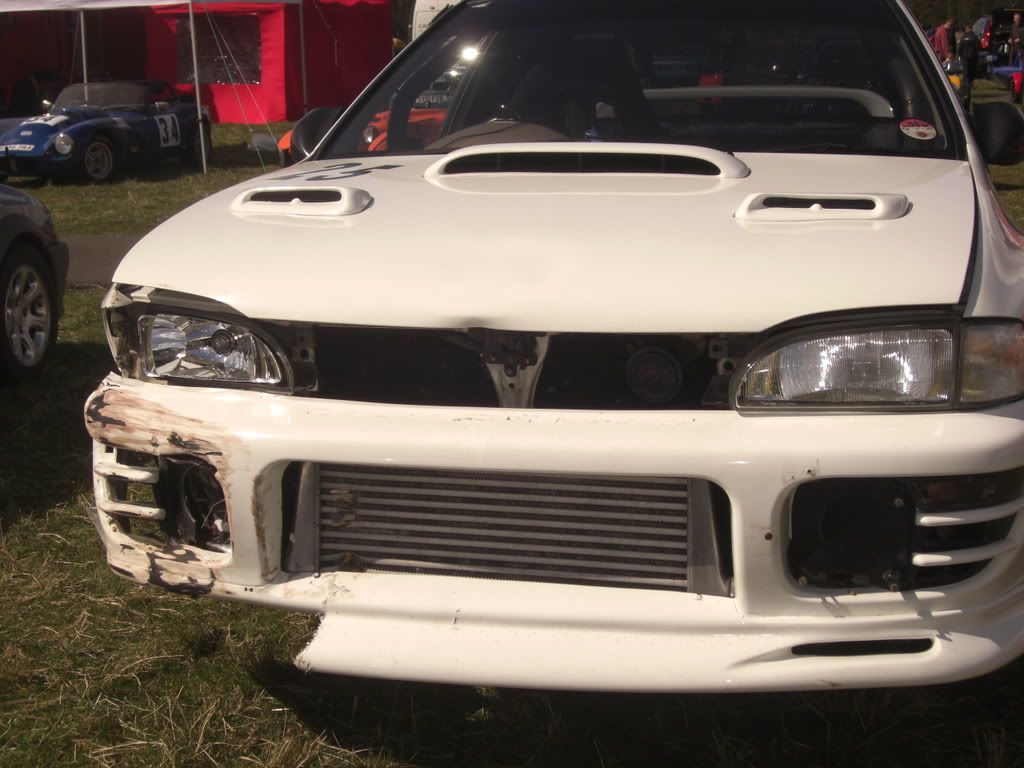
Most of the damage was pretty much confined to the bonnet, drivers wing, bumper/splitter, lights etc but the intercooler had suffered a direct hit from a piece of wood that clad the wall just after the corner so it was definitely a show stopper. I decided to strip the car there and then with a view to trying to get it ready for the Sun. After some much needed encouragement from John I set about it partly filled with anger at such a stupid error and partly with a determination not to let it beat me.
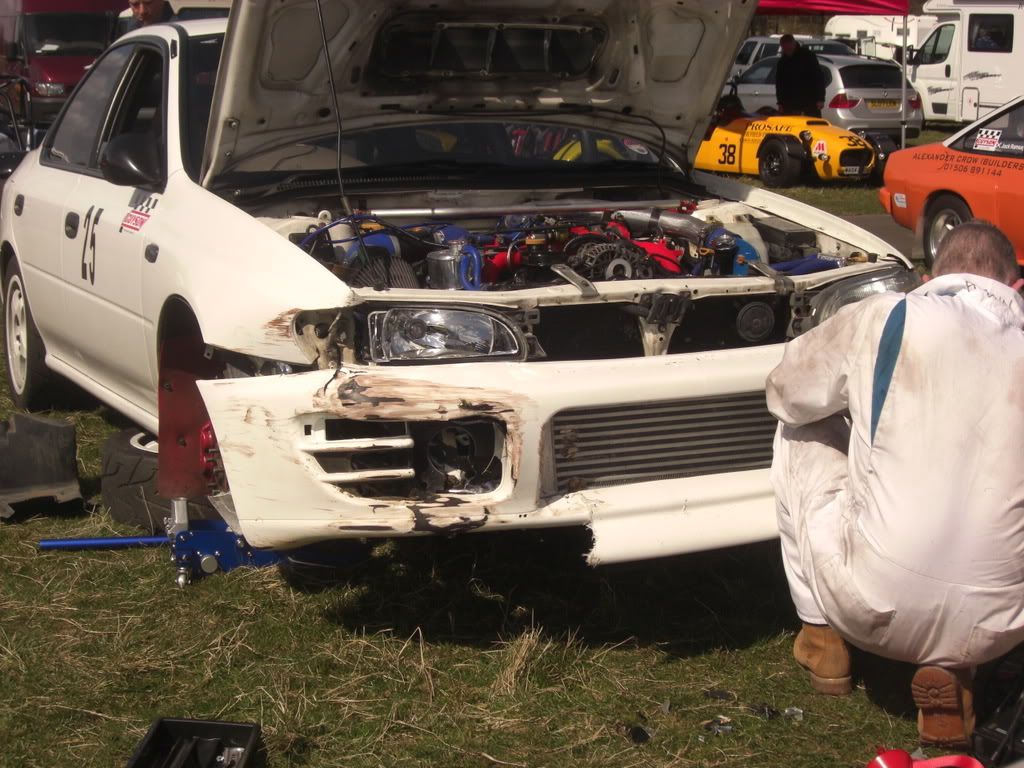
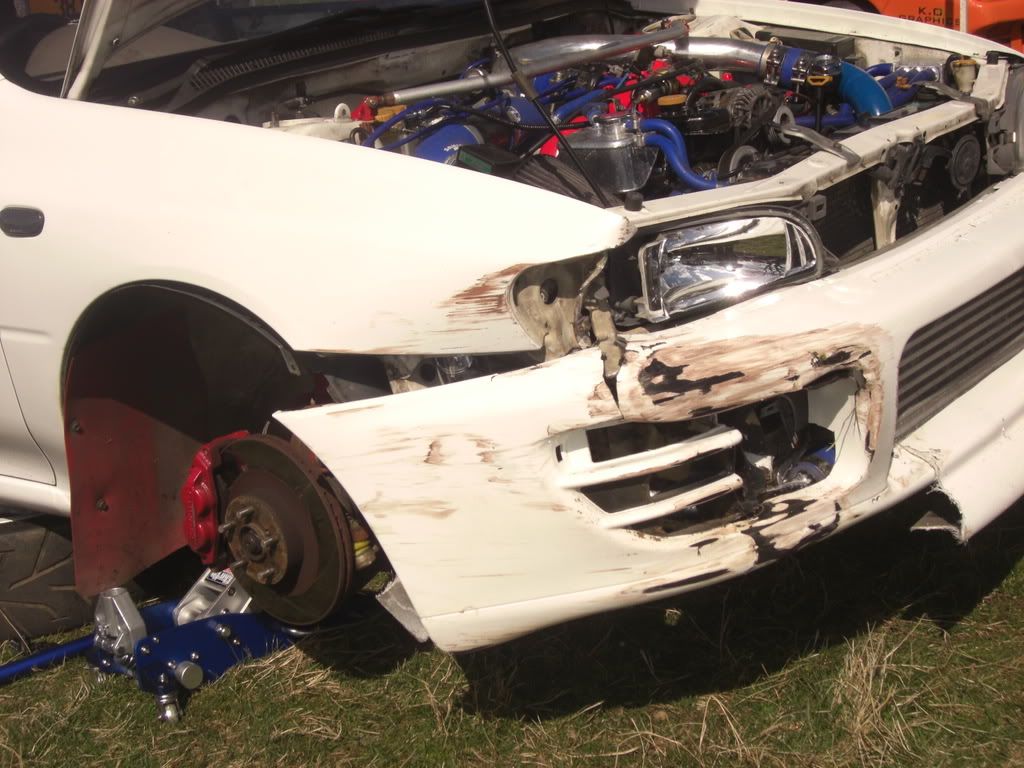
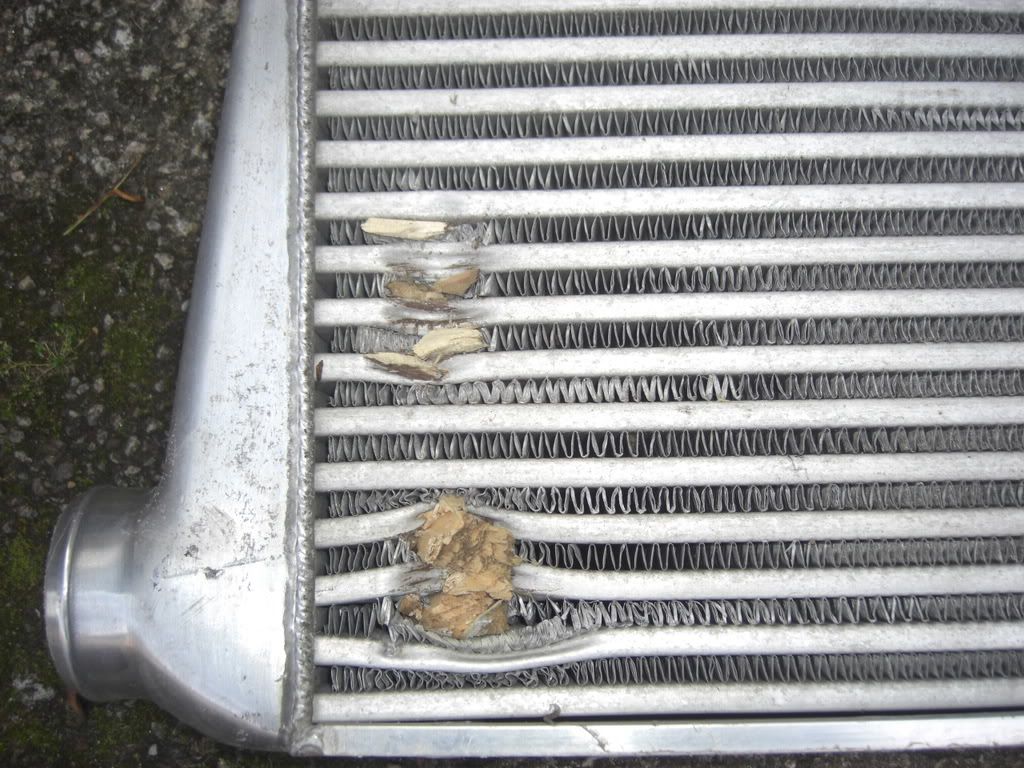
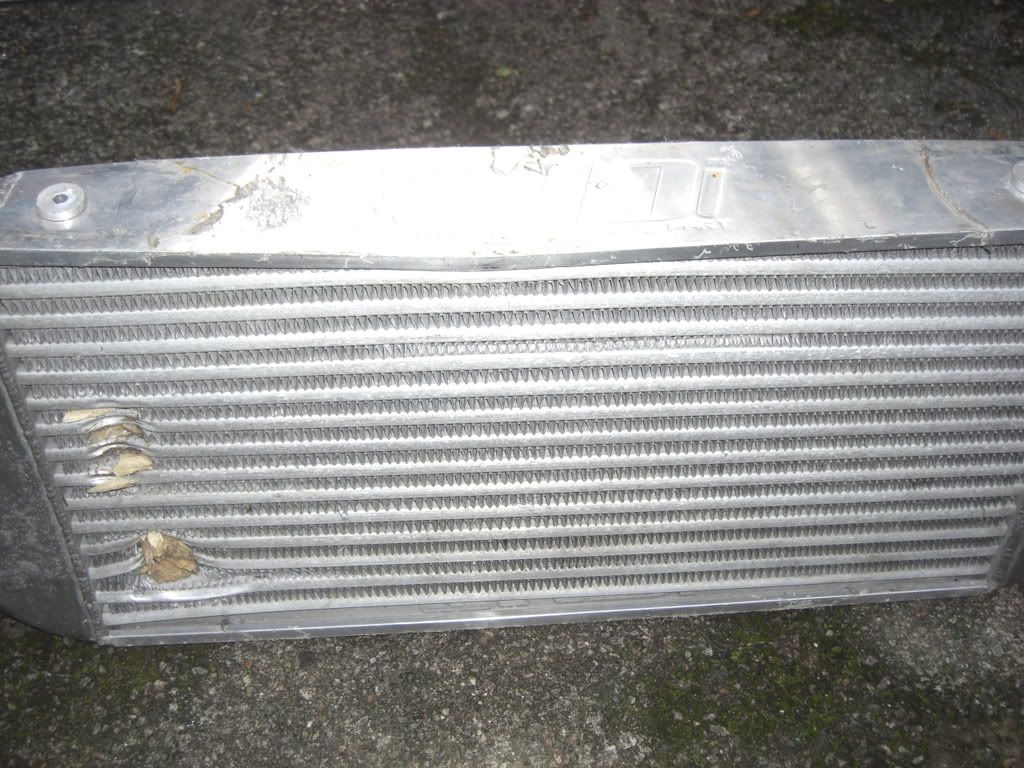
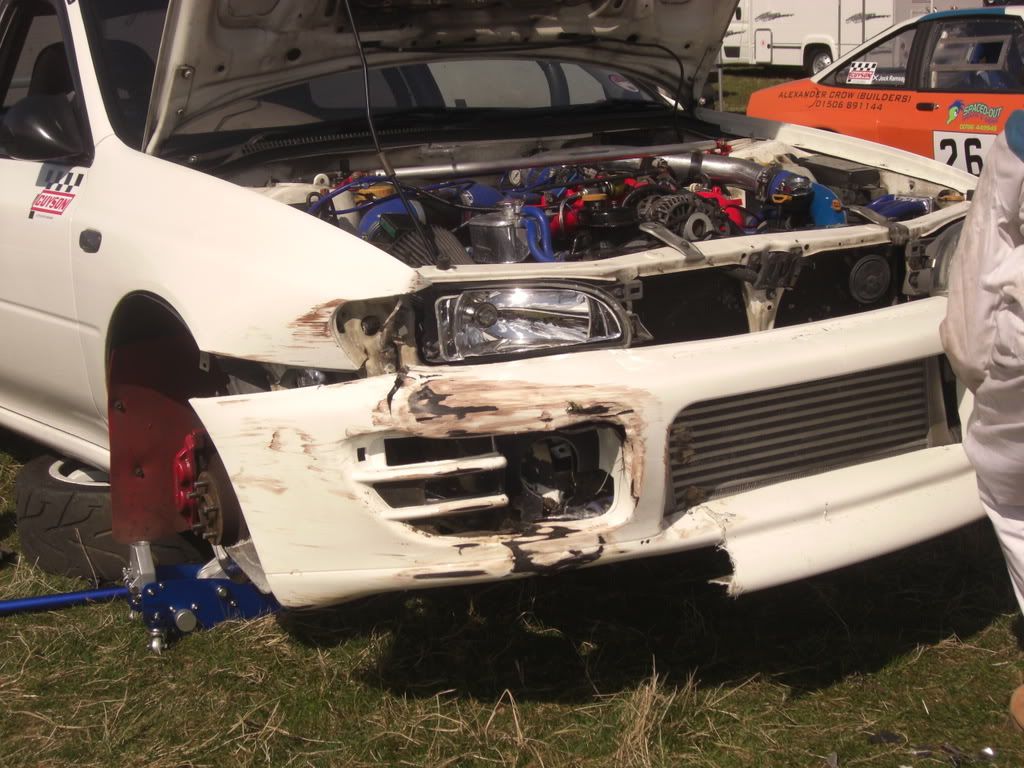
So with the car stripped it was easy to see what was needed to get it back running. The bonnet was pushed a bit. the drivers wing was bent slightly around the side light area, the headlight, sidelight and indicators on the drivers side were all damaged beyond repair. The intercooler core was, well you have seen the pics and the bottom drivers side intercooler pipe was shall we say a different shape and had a bit of a restriction

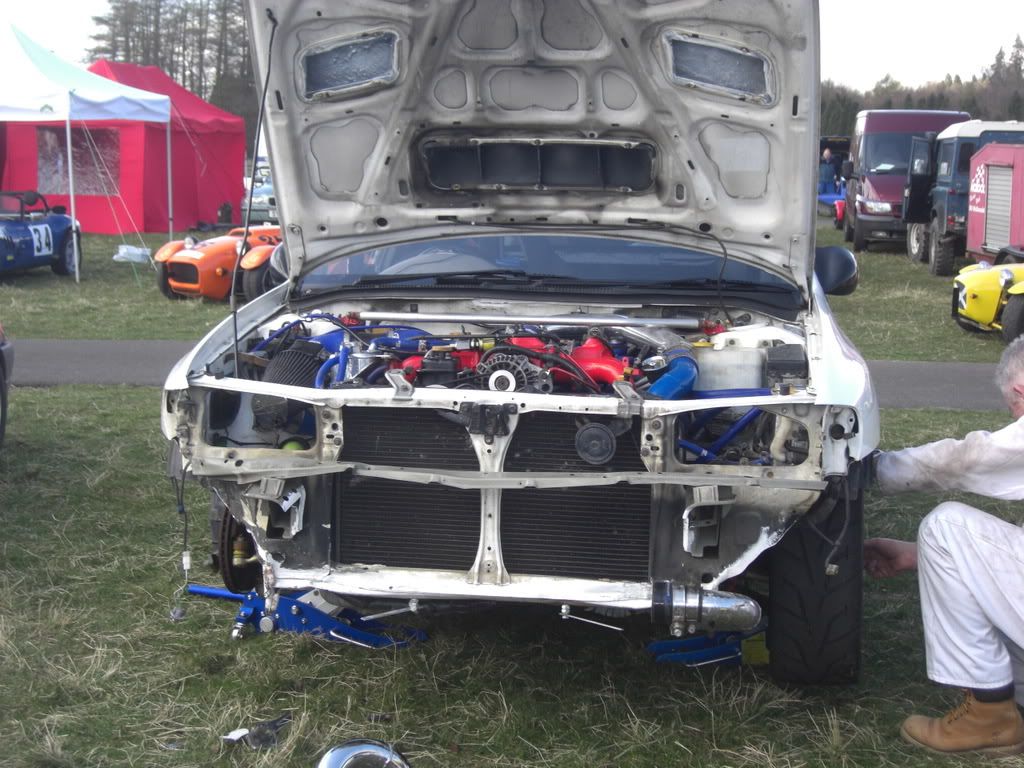
With the car all stripped and John finished his timed runs we loaded it onto Johns trailer and headed of to John's to carry out some cosmetic surgery. With some new parts from the Stevenson spares package and some very useful MSA approved white tape
 to rebuild the front bumper we had the car road legal and running within 2 hours - result
We ended up with the following result the next day.
Picture showing the wooden clad wall on the drivers side I managed to modify
I would love to say I jumped in the car torched up the hill and beat the class record but you would know I was lying
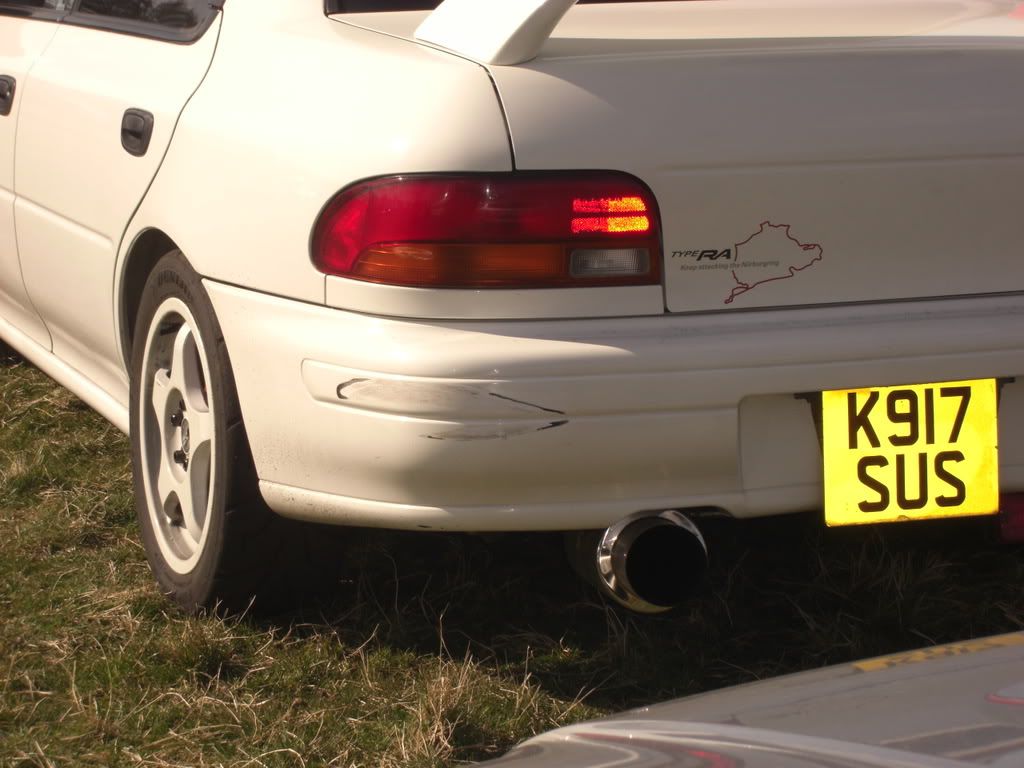
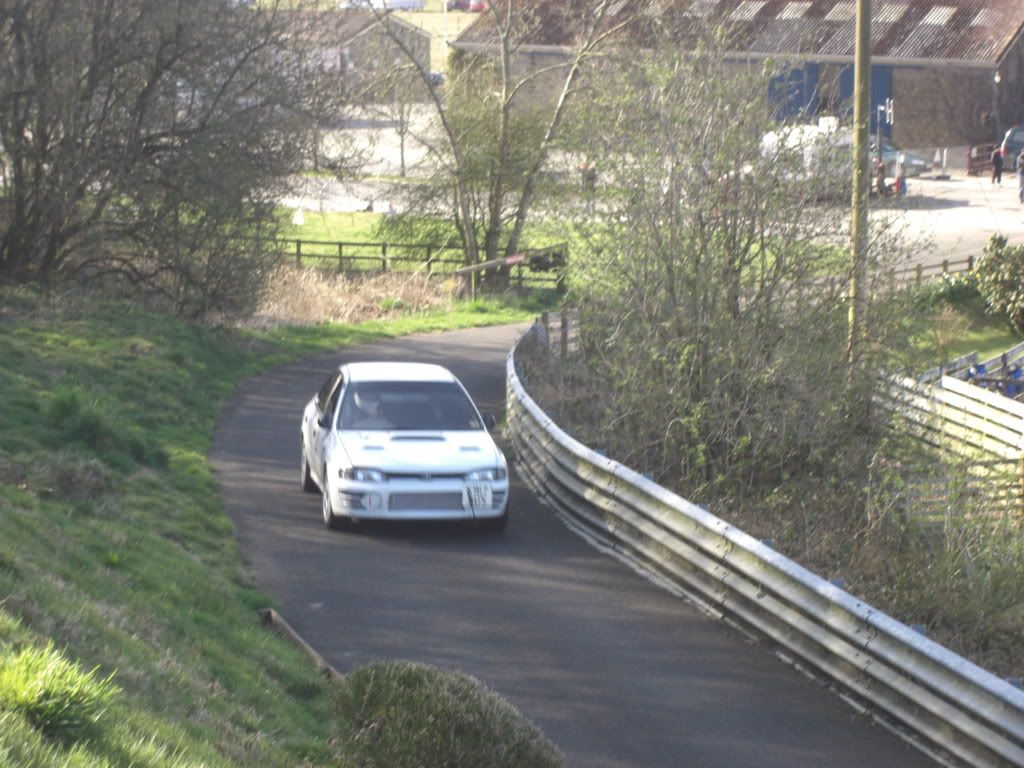
 so I managed 4 runs up the hill and a respectable final time which got me 2 points in the championship. So its fair to say I will remember my first outing at Doune. I have deliberately not done anything with the rear bumper to keep as a reminder not to get to smart as the car will bite back. I now look at Doune with a lot more respect, at 14 feet wide and wall and armco either side of the first half of the hill it is a hill that quite rightly deserves respect. I owe a massive thanks to John for his help and support on that day as it was definitely a back to earth with a bump sort of day. But as with all experiences all you can do is try to learn from it.
to be cont
-
I'm patiently waiting for the next installment .....
Feel free to chuck any of my shots of the car in action up too Arch.
Will do mate got quite a few good shots that you took for later on. I keep going back and adding bits that I forgot. There is so much I have forgotten especially some of the smaller things done to the car.
Will try and do some more tomorrow, thanks for the kind replies
And to think I only started doing this because I had slowed down so much at footy that the red card totals were
becoming silly I was a bit like david Weir just faster
Dave the coilovers have worked really well this year but they are about to expire
-
Hi i'm wondering if anyone knows how much a complete bottom end block would cost from Subaru?
I heard someone can get them for 1600? Is this true?
Thanks Brian
Contact Mark at Lateral performance

-
CONT
Well at this point it would be around Feb this year and the pressure is starting to mount. So I arranged a mapping session with Andy and headed off to Port Seaton. Things didnt go well with the car running very rough but I made the assumption that the changes that had been made along with the guesstimate fueling would be the cause. Once at Andy's it became apparent that there was something not right he could not set up the idle and the fueling was all wrong at idle. Andy immediately suspected an air leak, he spent considerable time and effort trying to sort the problem out for me but it became obvious that it was pointless. I was conscious of not wanting to waste Andy's time any more than I already had so I set off back home a bit deflated and very down.
The next morning I decided to try and solve the problem, armed with Andy's advice and some advice and encouragement from John the previous night, I set about trying to find the leak. I used a can of smoke detector testing spray around all the areas I had disturbed and it became obvious that there was an issue around the no.3 cylinder leg of the inlet manifold so it was off with the manifold and the culprit was diagnosed.
There was a crack in the leg of the manifold. This must have happened when I refitted it, I am still unsure why this happened as the gaskets were not creased or damaged so it may just have been a weakness in the casting as the bolts were not overtightened on fitment. So it was my subaru guru to the rescue once again with another inlet manifold. A quick coat of paint and in it went and I then adjusted the injector duty cycles to the levels recommended by Andy (the car would not previously run at these settings). I was certain that I had sorted the problem so when I turned the key to find it still did not idle, but did at least run with these settings, I was a bit surprised. Andy had been a bit unsure of the ICV when I was through so I changed this and hey presto the car ran pretty sweet with no idle issues. Thank ****.
I now had real time issues as the season was near to starting and I had not had the car on track at all. A call to Andy brought good news as he kindly managed to sqeeze me in at short notice, thanks again for that it is appreciated.
Well off I went across to Port Seaton again but this time I was fairly confident that the car was ok, it ran fine and idled ok. As is the norm Andy done his thing and transformed the car. Due to time constraints we did not have time to carry out a road dyno run so I am unsure of the power but given that the engine and Turbo are standard I would suspect that the power is near 300BHP with possibly similar torque figures maybe slightly less.
Next came the call to John at Progrip in Bonnybridge to have the geometry set up. John managed to slot me in when I explained my problems. John set the car up to the settings John St had recommended using some pretty nifty equipment. After a bit of banter and a cup of tea I parted with a more than reasonable sum of money for what I would suggest is a lot of work for very reasonable cost from a guy who knows this area of cars inside out.
On the way home I had the chance to throw the car around a little and was amazed at what it would let me do without unsettling the car, thanks John top work.

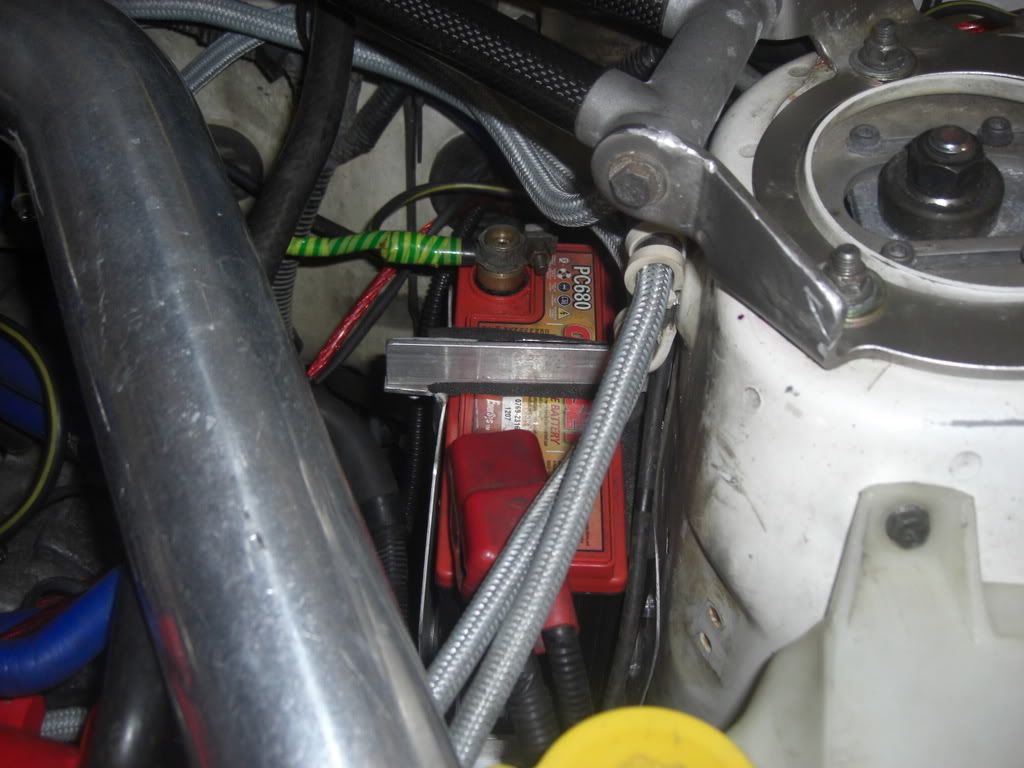
At this point all I had to do was fit a catch can, remove the battery and fit and relocate the new gel battery I got via a scoobynet group buy. I also needed tart up the outside and fit a Splitter, some mini bonnet scoops and some much cheapness wing mirrors. I also had to get my personal scrutineer down from Cumbernauld to check my handy work out.
The battery relocation was fairly straight forward as I had already had a custom made battery tray made that would allow fitment on the rear of the LH chasis leg

With everthing pretty much in place I had completely ran out of time and the first event was only a week away. That left no time to test the car or look at any suspension tweeks etc so it was pretty much a case of being thrown in at the deep end.
I had already orgainised my entry and had my competition licence suit helmet and boots all ready to go. So with everything organised it was off to Kames for my very first sprint of what looked like a daunting list of events.
SSC Round 1 13 April, 2008 Kames Scottish Sporting C.C.
SHC Round 1 19 April, 2008 Doune Lothian C.C.
SHC Round 2* 20 April, 2008 Doune Lothian C.C.
SHC Round 3 27 April, 2008 Forrestburn Monklands Sporting C.C.
SSC Round 2 03 May, 2008 East Fortune Lothian C.C
SSC Round 3 04 May, 2008 East Fortune Lothian C.C
SHC Round 4* 10 May, 2008 Fintray Grampian A.C.
SHC Round 5 11 May, 2008 Fintray Grampian A.C.
SSC Round 4* 24 May, 2008 Kames East Ayrshire C.C.
SSC Round 5 25 May, 2008 Kames Machars Car Club
SSC Round 6* 7 June, 2008 Golspie Littleferry Caithness C.C.
SSC Round 7 8 June, 2008 Golspie Kylestrome Caithness C.C.
SHC Round 6 21/22 June, 2008 Doune Lothian C.C.
SHC Round 7 28 June, 2008 Forrestburn Monklands Sporting C.C.
SHC Round 8* 29 June, 2008 Forrestburn Monklands Sporting C.C.
SSC Round 8* 5 July, 2008 Boyndie Circuit 1 Aberdeen & District M.C.
SSC Round 9 6 July, 2008 Boyndie Circuit 2 Aberdeen & District M.C.
SSC Round 10* 19/20 July, 2008 Alford Grampian A.C.
SSC Round 11 2 August, 2008 Kames East Ayrshire C.C.
SSC Round 12 3 August, 2008 Kames East Ayrshire C.C.
SHC Round 9* 9 August , 2008 Fintray Grampian A.C.
SHC Round 10 10 August, 2008 Fintray Grampian A.C.
SHC Round 11* 24 August, 2008 Forrestburn Monklands Sporting C.C.
SSC Round 13 13 September, 2008 Golspie Littleferry Caithness C.C.
SSC Round 14* 14 September, 2008 Golspie Kylestrome Caithness C.C.
SSC Round 15 20 September, 2008 Alford Aberdeen & District M.C.
SSC Round 16 21 September, 2008 Alford Aberdeen & District M.C.
SSC Round 12 27/28 September, 2008 Doune Lothian C.C
As i expected for my first ever event it rained
, while this was good for one other 4 wheel drive car and driver who has lots of experience it didnt exactly fill me with joy. Fortunately it didnt rain all weekend. 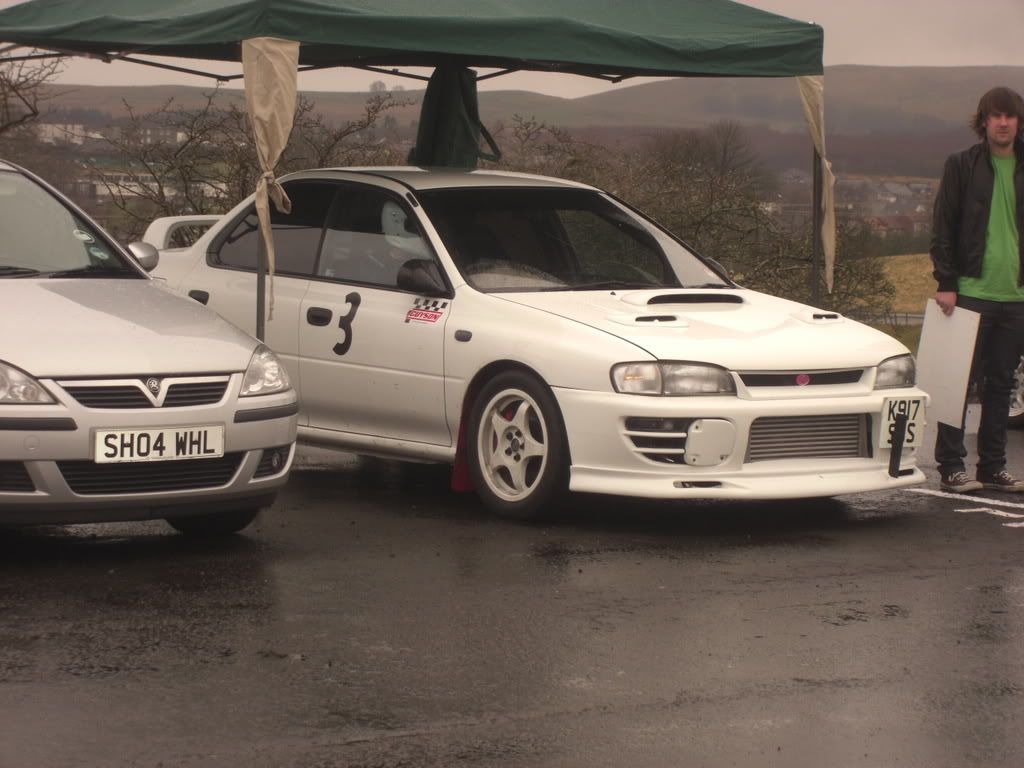
So here we go first start and I must admit it was a weird feeling real excitement but also a little apprehension.
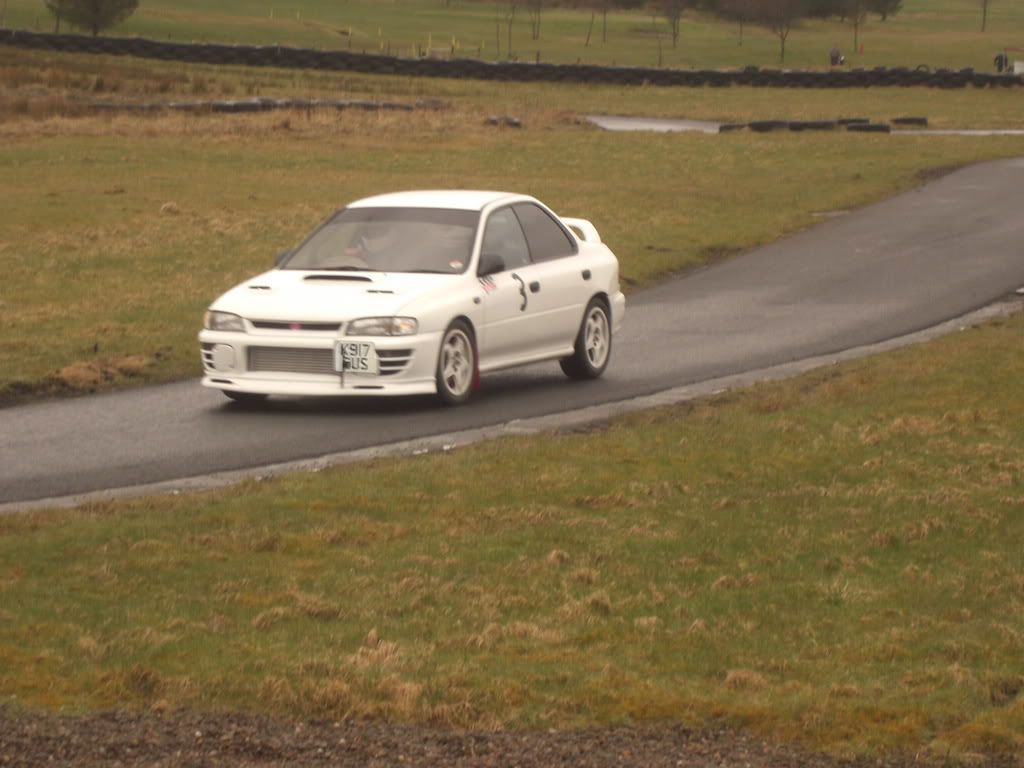
John was also on track showing me how it should be done.
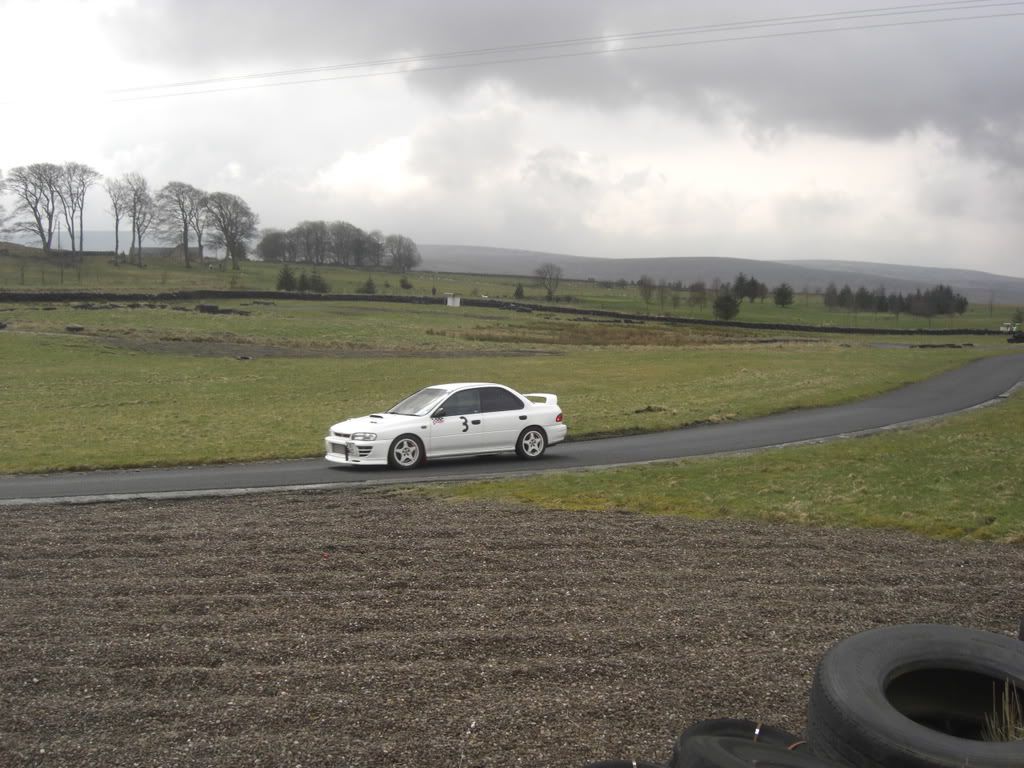
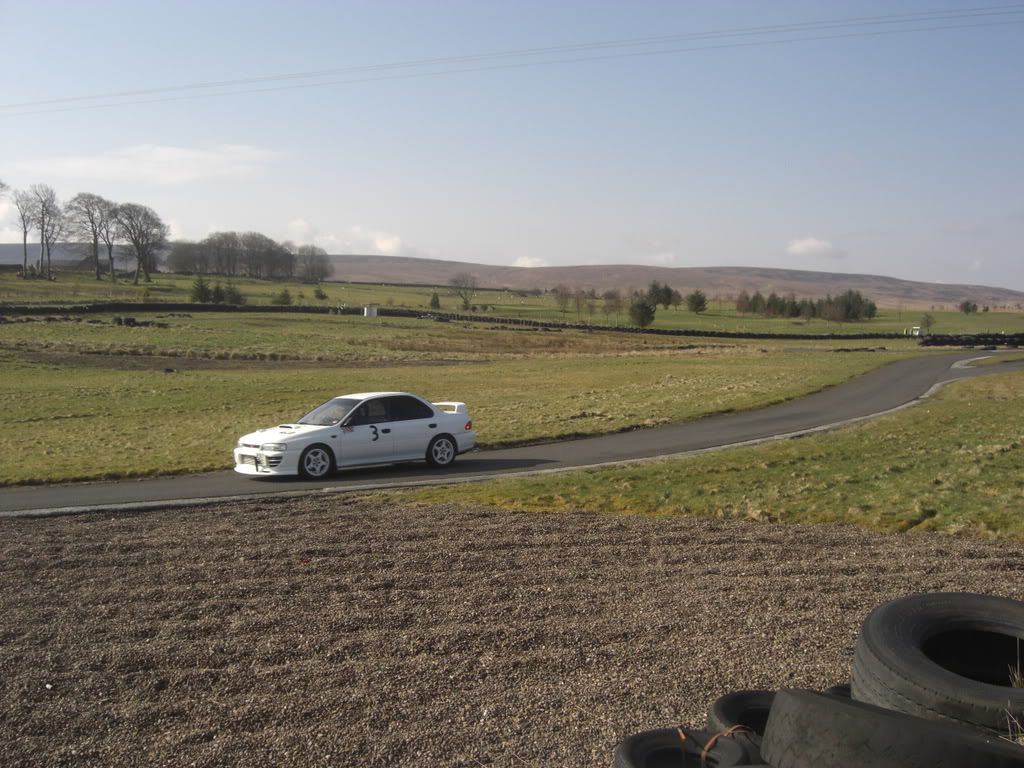
So with the first event done and no issues with the car at all it I was pretty pleased. I certainly wasnt the fastest on the day but that was never going to be the case and having proven the car over a 2 day event I was happy with my work over the winter. The car handled well and went pretty well to, the limiting factor was definately the ability of the driver
but as time went on I hoped to show steady improvement.So next up the easiest event of the calender, Doune, shouldnt have to many issues there after all its only a small hillclimb and only about 50 secs. How hard can it be
to be Cont
-
Good post Arch. See you on Sunday. Remember and steer a bit more for that first corner though
Thanks stephen will hopefully get that bit written up before the weekend.
Tongue in cheek Greig I know there will be a reason your not entering but remember you wont get any practice time at Doune the way you have been able to do at Forrestburn so this would have been an ideal oppertunity for you to run up the hill with absolutely no pressure.
-
Nice one arch giving me ideas now lol you know anything anout how the classes are going to go for next year?
See you at doune on sat sun. Don`t think im running tho Greig
P.S how goes it Paul hows the mood in your camp?
Greig
Thanks guys.
Greig I had noticed you bottled it
As far as i know all the classes will be exactly the same next year but 2010 will see a lot of changes which will be pretty much as per the blue book.
-
cont
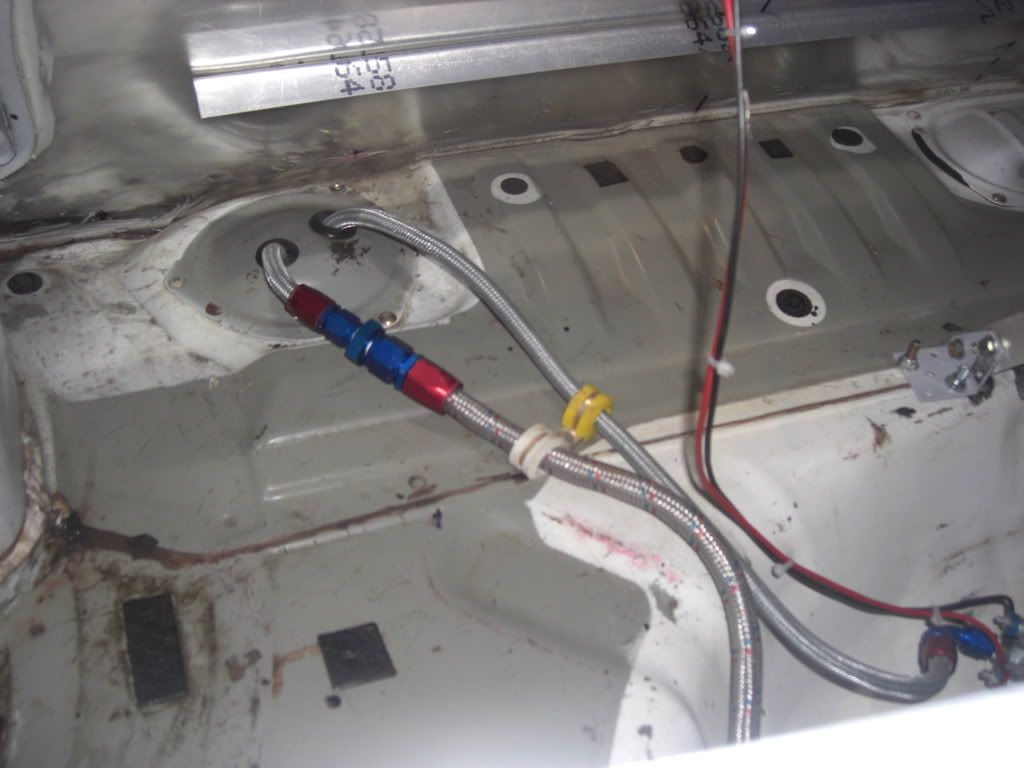
Next it was time to tackle the fuel tank in the boot, run the fuel lines to the tank and instal the filter, pump and new pump wiring. I used a new fused feed for the pump as it would draw more current than the original in tank pump Walbro and used the original fuel pump switching signal to switch a relay which then supplied the power to the relay. The tank is baffled at two levels to ensure there will be no fuel surge at low fuel levels. The tank was designed by John St so that we could use a tank with sufficient quantity to allow road use but able to run with minimal fuel on track without any surge issues. It has proven to be very very effective. John hasnt had a chance or real need to use his yet but at least we now know it works really well. I had to add bracing for the tank as the whole design is based on a tall thin tank so I used some light alluminium angle to provide a very strong but light support structure. At the time I had to make sure the positioning of the supports provided sufficient rigidity to the tank but also left me space to carry jerry cans in the boot as I would be driving to and from events. The bracing was time consuming but well worth it.
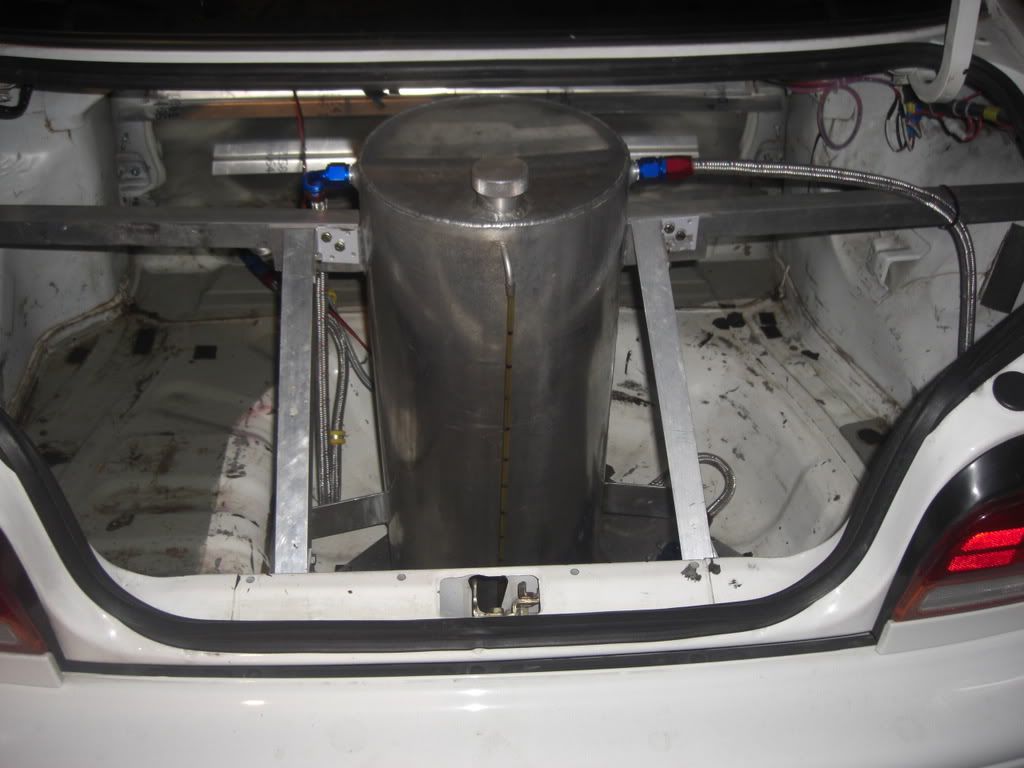
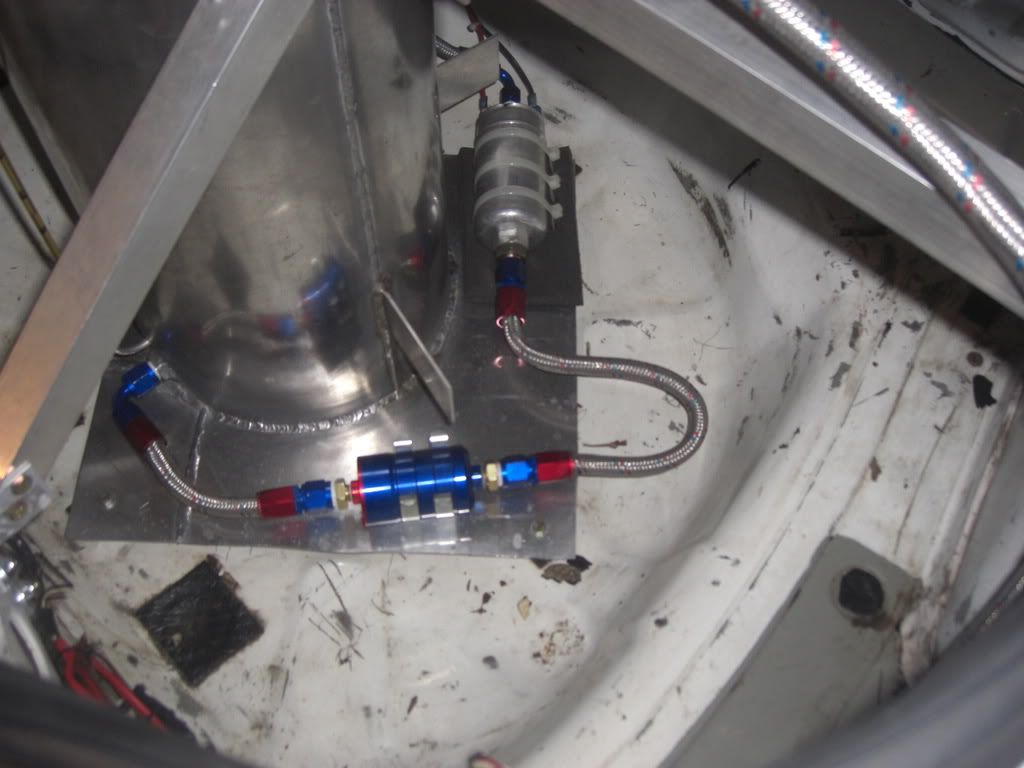
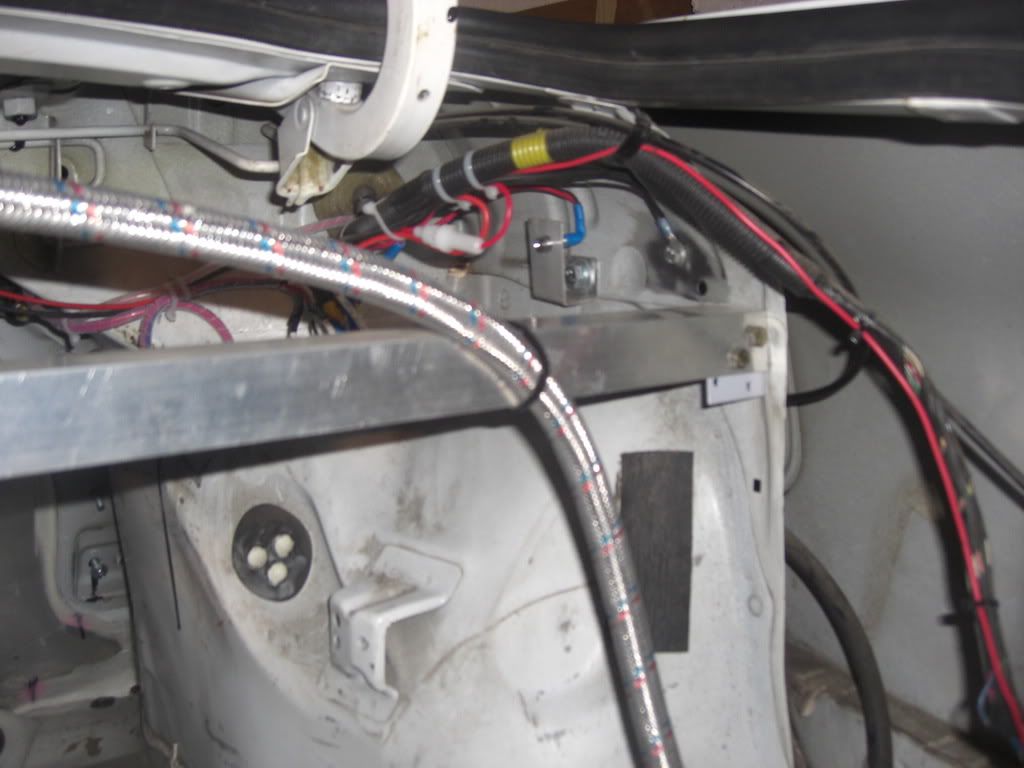
I added a small LED to the fuel pump power feed which allows to see at a glance if the pump is getting a power supply this would save time in diagnosing a fuel pump problem. I have also fused the pump after the relay.
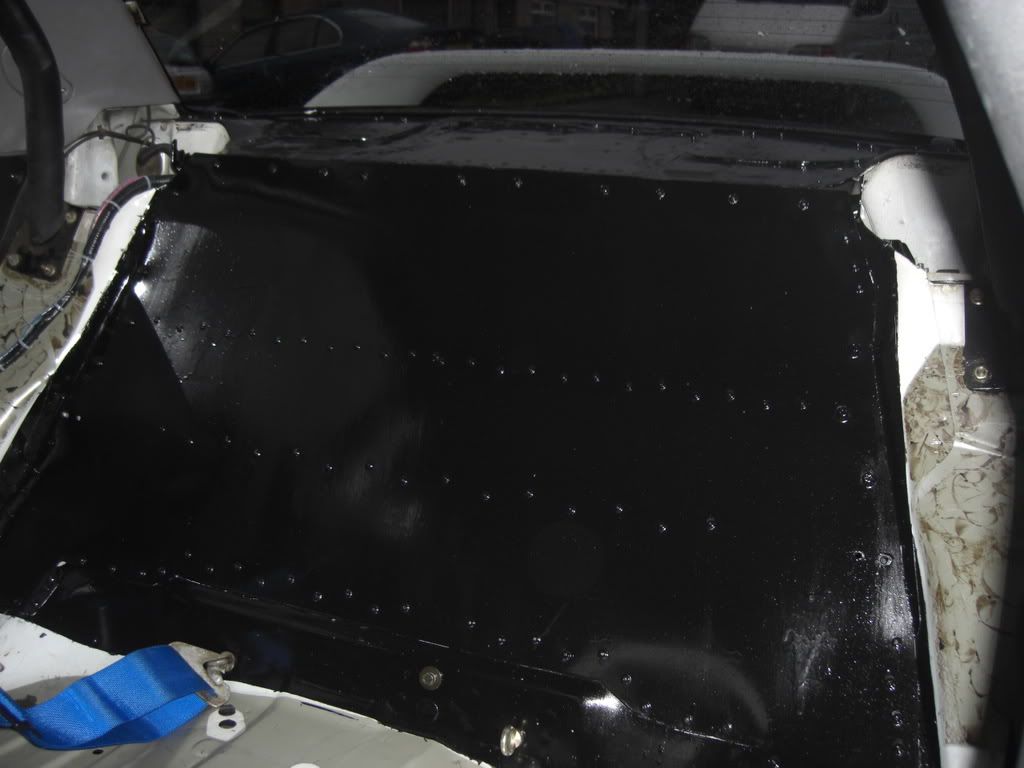
Having fitted the tank in the boot it is necessary to firewalll the inside of the car from the boot. I done this by shaping and cutting a large piece of aircraft grade alluminium and riveting this in place. I again used some light weight alluminium angle to brace the rear of the panel to stop it flapping around and acting like one of Raulph Harris's bendy comedy musical instruments
. At the same time all the cut outs on the rear window shelf were also fire walled in the same way. All panels were then sealed with fire resistant sealant to ensure no fluids could transfer into the cabin if things went wrong. 
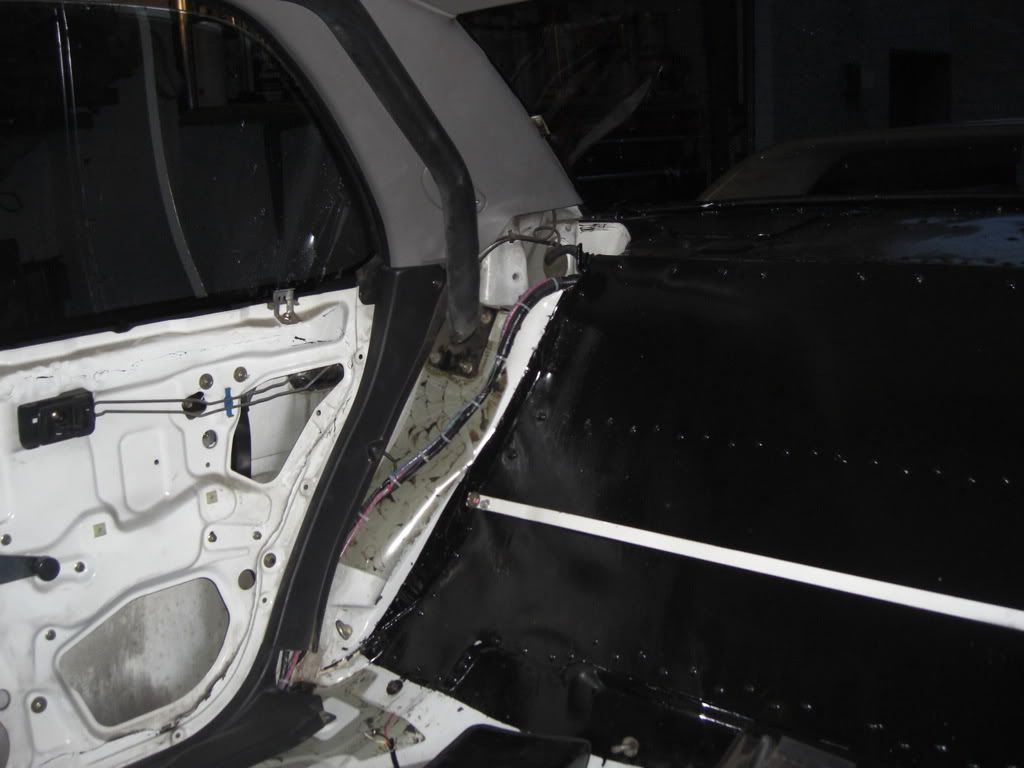
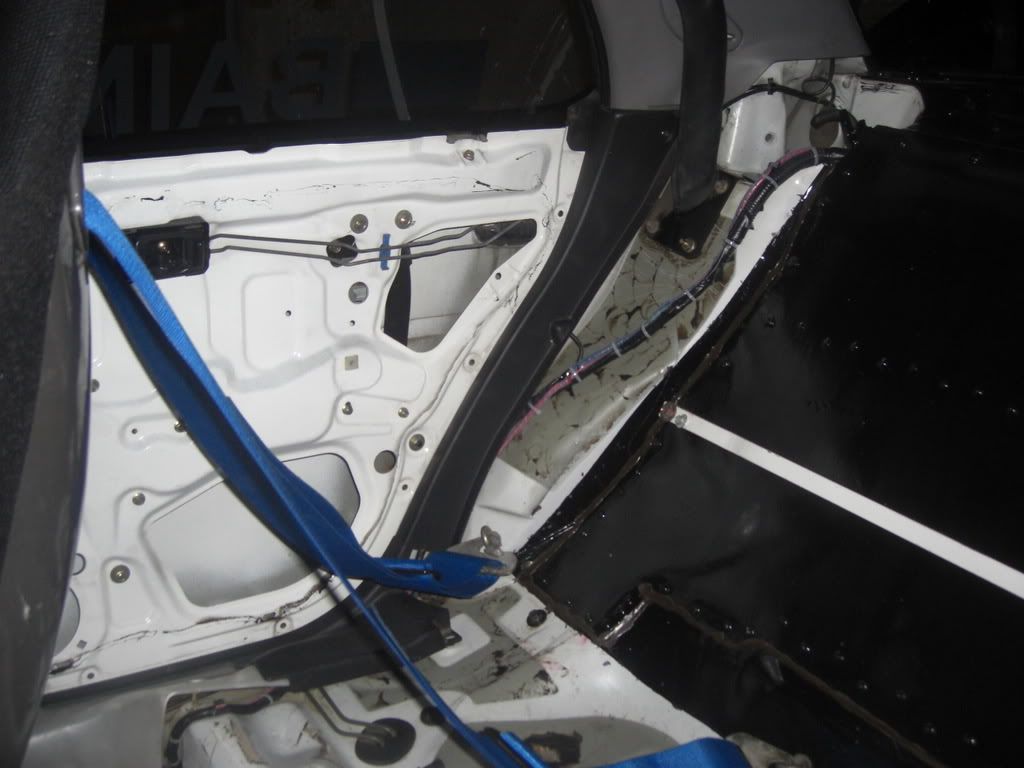
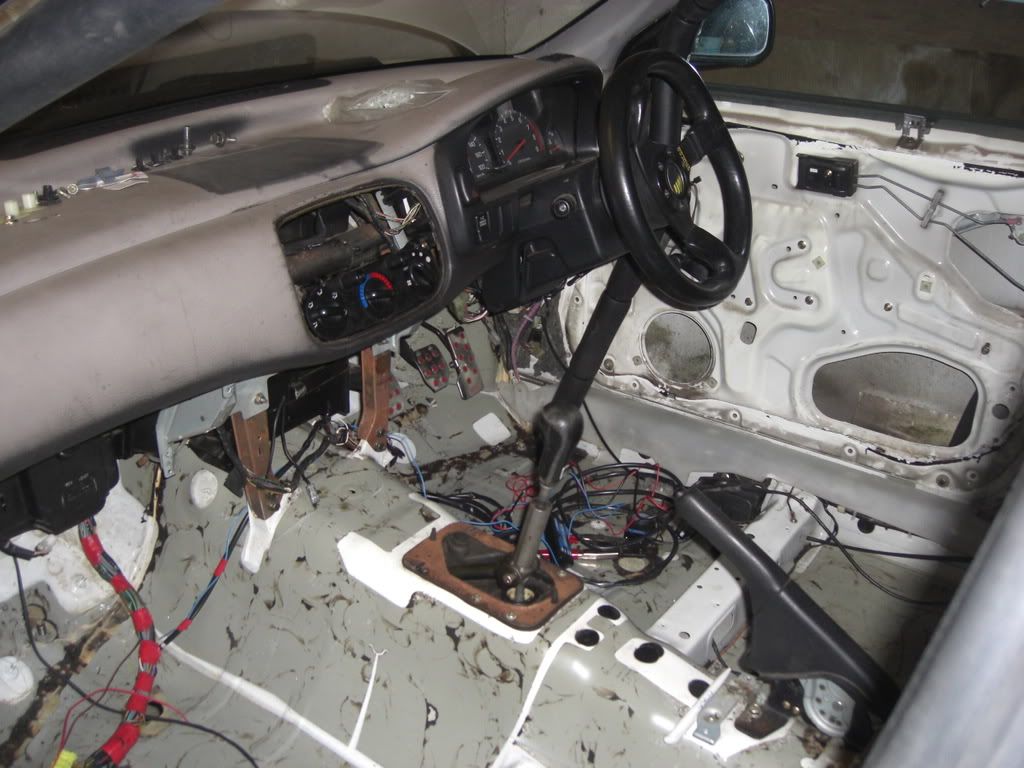
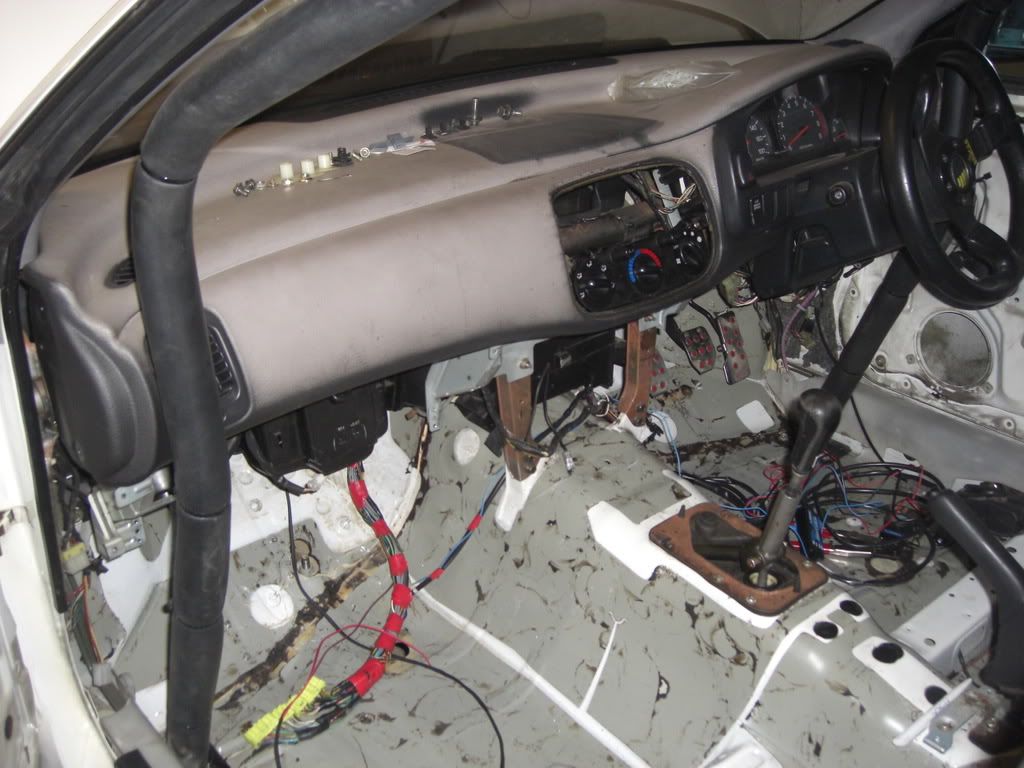
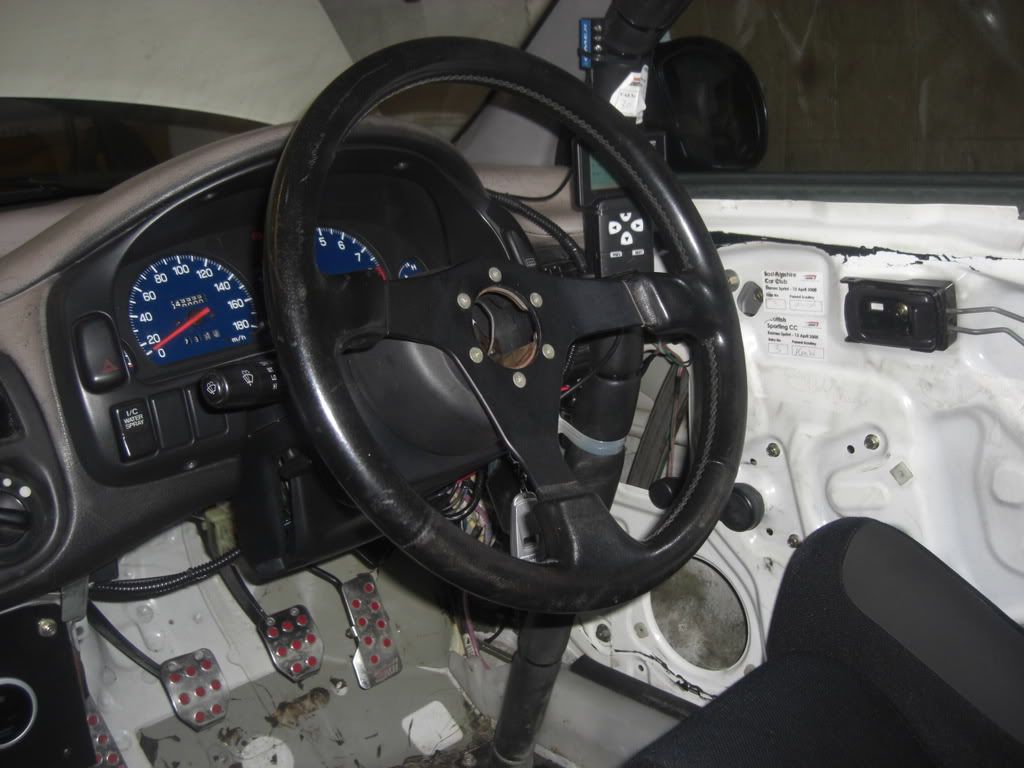
Next I removed as much of the interior trim as possible including the carpet underseal and door trims seats etc.
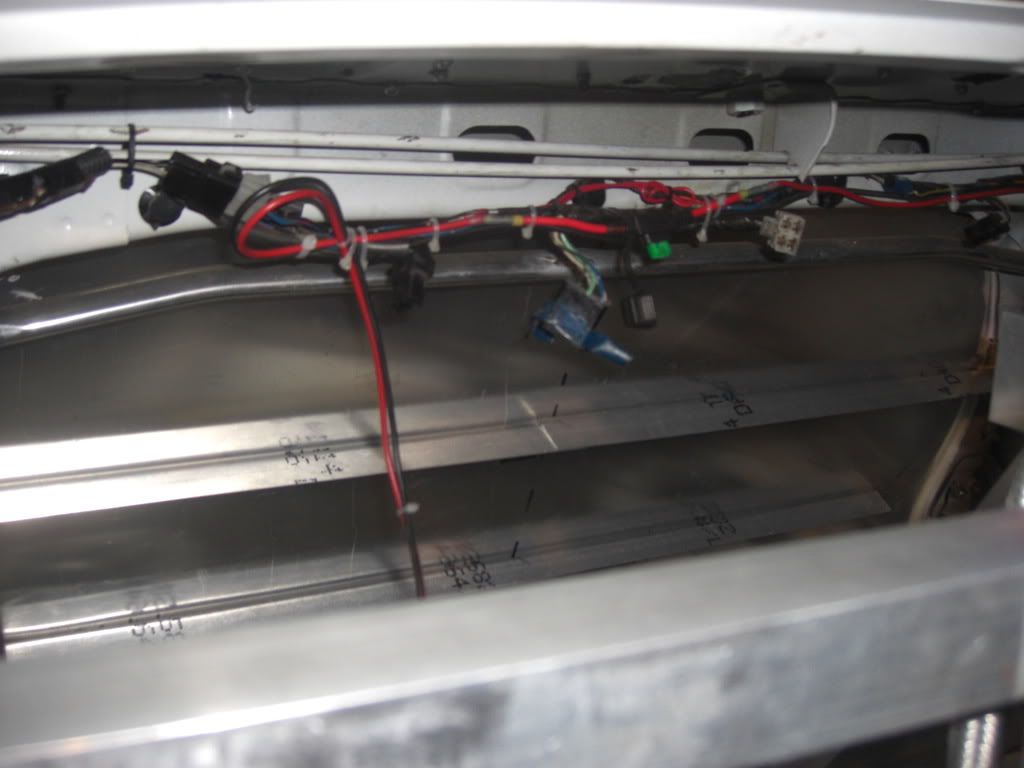
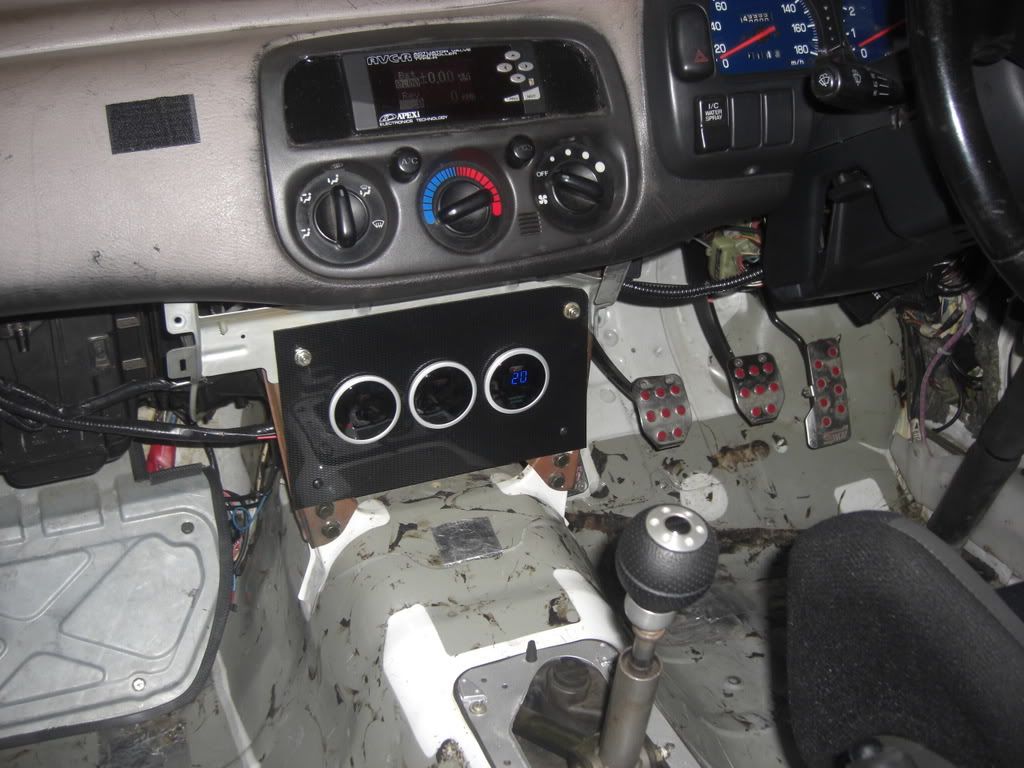
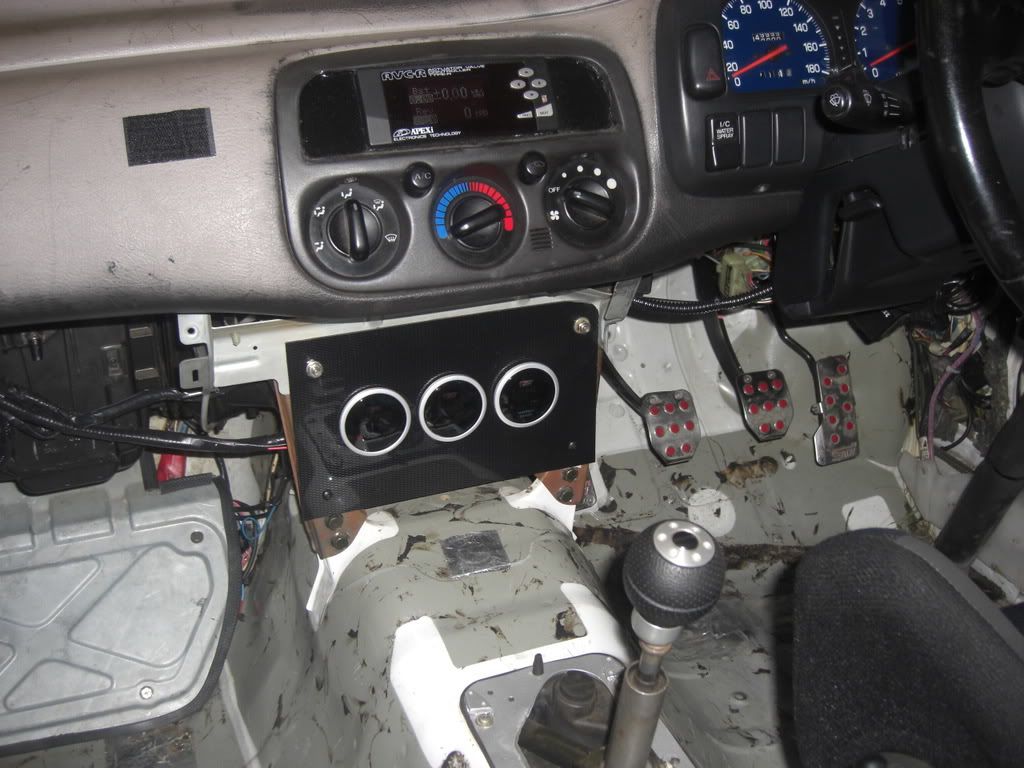
Things were really starting to take shape at this point but I still had to wire in the AVCR and mount MY APEXI Power FC and Commander. I also had a shift light which I wanted to mount on the cage leg around eye level and set of gauges to plumb, wire and mount (Oil PX, Oil Temp and water temp).
I decided not to use the temp gauge to measure water temp but place the sensor as close as possible to the air filter to give an indication of inlet air temp. I am not happy with the inside of the car, it is functional but looks tatty. At this stage there was no reason to smarten it up too much as I would be packing the car with wheels, spares, tools etc when driving to and from events.

The next stage was to get the car running. On advice from Andy F, I used a safe setting for injector duty cycle with the plan of getting the car running and off over to Andy for him to work his magic on it.
to be cont
-
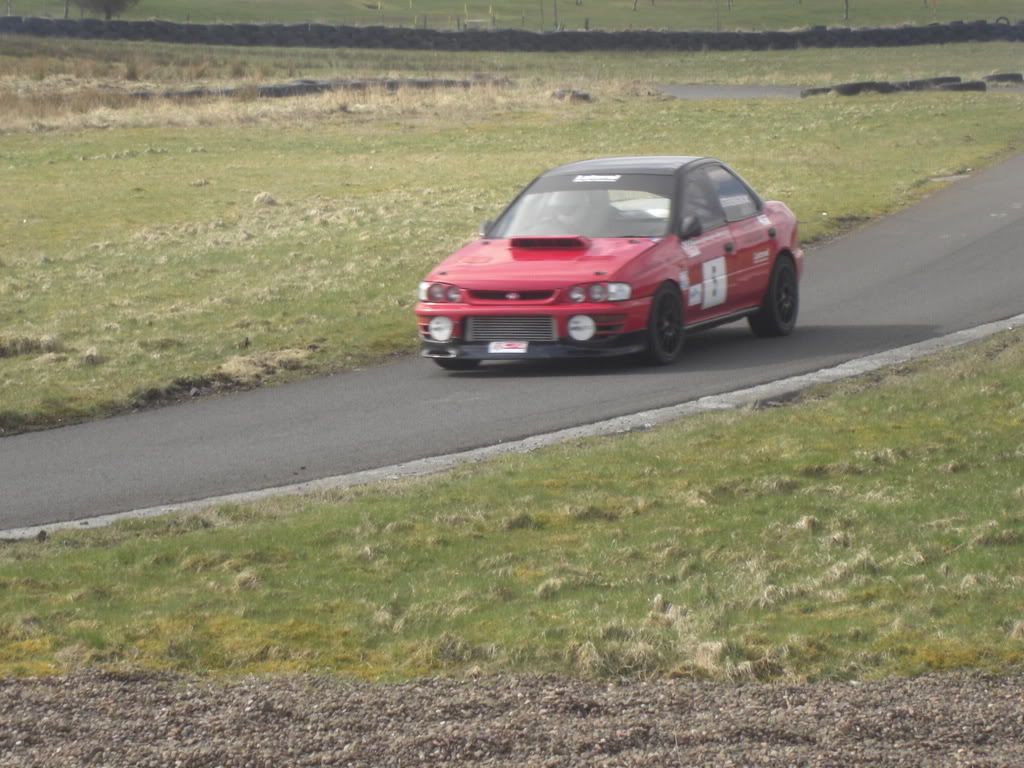
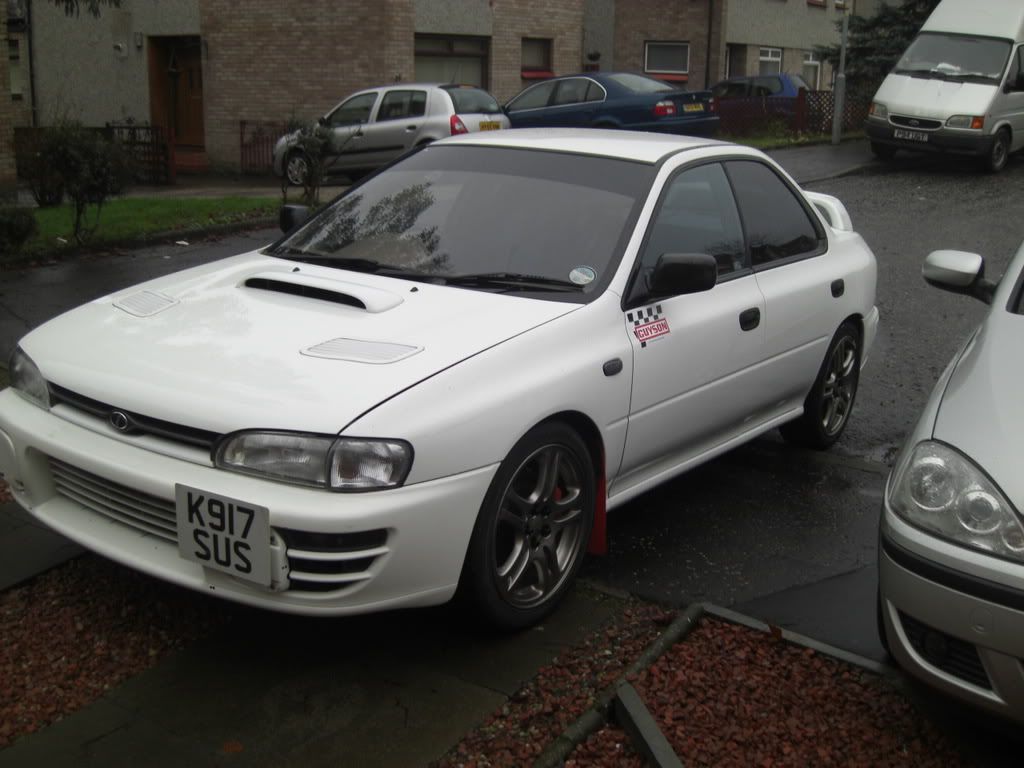
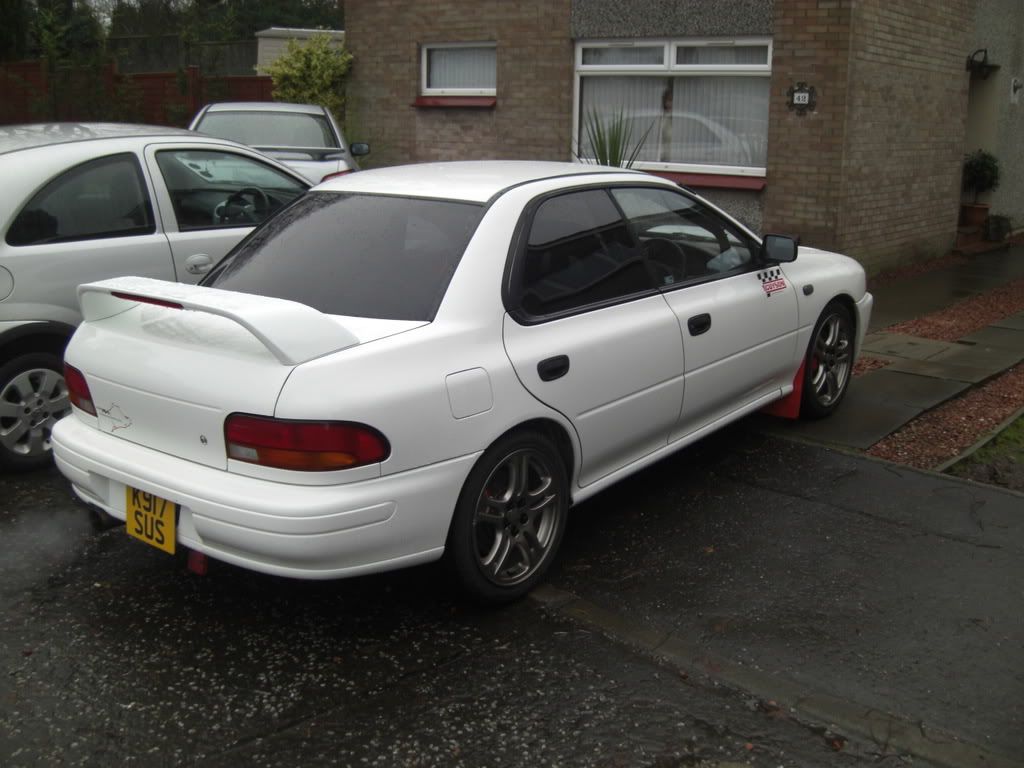
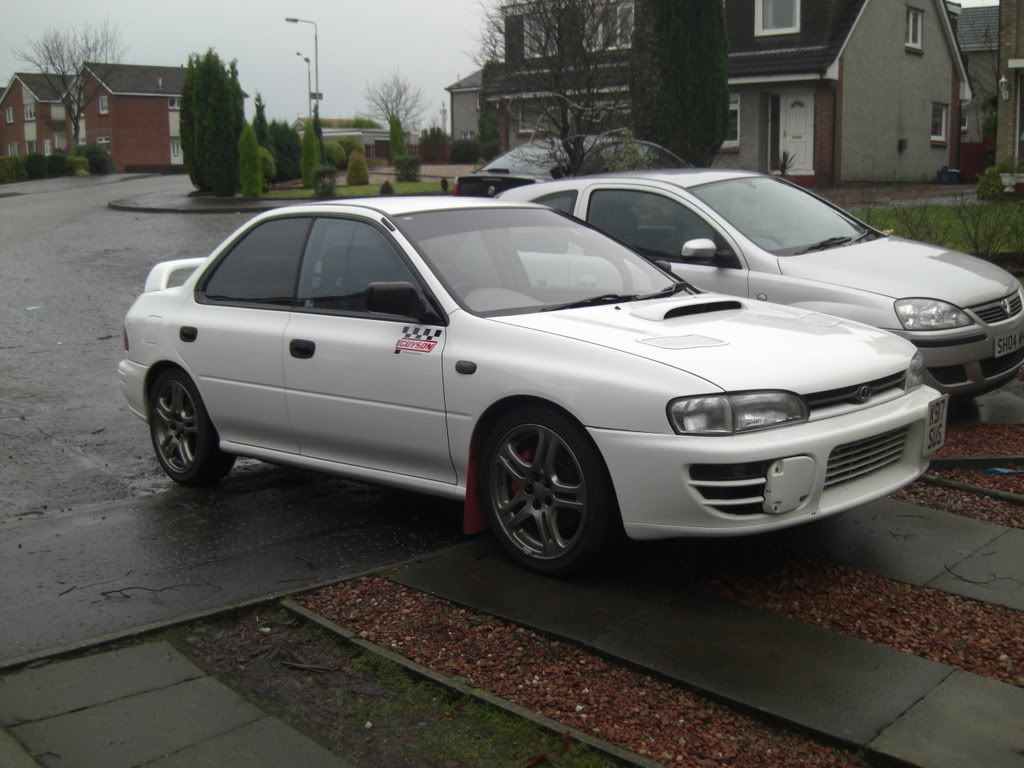
Well decided it was about time I posted some info on the car I have been using this year in the Scottish Hll climb and sprint Championship. The car is a MY93 WRX RA and apart from a set of Coilovers, a newage WRX TMIC, induction kit and a 3" decat system, it was pretty much standard when I purchased it.

The car was in pretty good condition with only very light surface corrosion on the underside so that had to be treated and painted first, the rear suspension however was showing signs of rust so it was all removed cleaned and either treated and painted or replaced. The car underfloor area was sanded down down, washed and treated with POR 15 metal ready which is almost like a zinc coating. It was painted with Por 15 paint which is a very hard wearing paint designed for just this sort of application. It went on amazingly well and gave a high gloss finish which looks good, not the intention but a bonus, and is easy to keep clean. One unwanted by product of the POR 15 is the 2 weeks it takes to get all the drops and splashes off your skin. Even suited up and with gloves on I still managed to get covered in it, looked like a dalmation for about a week
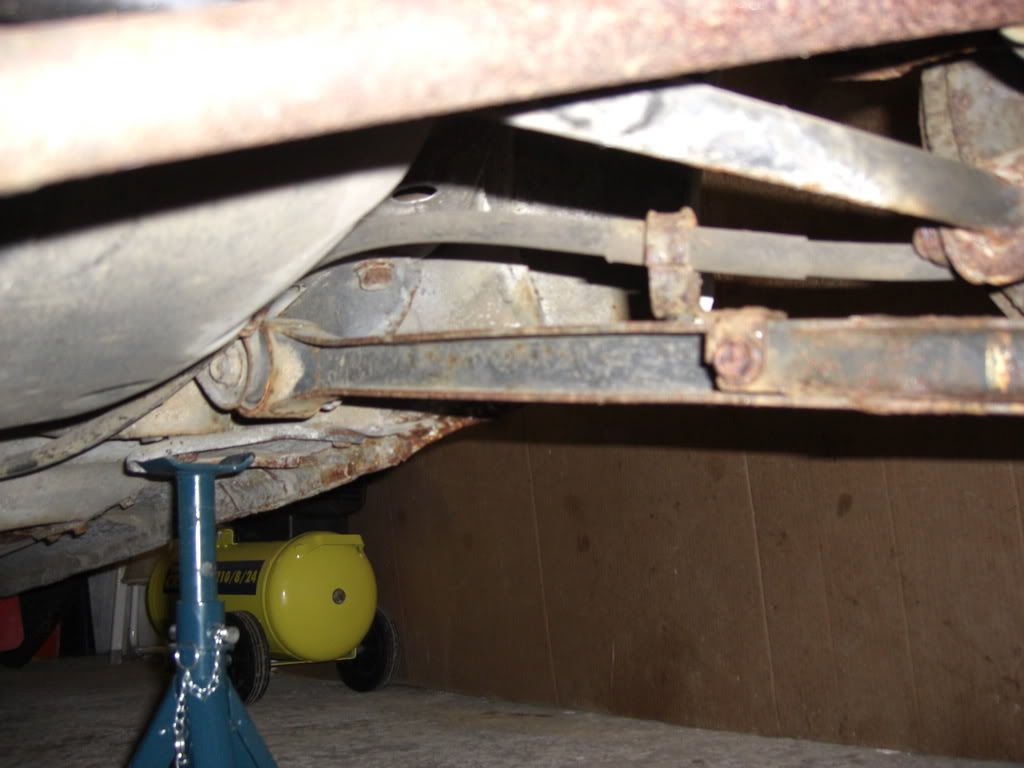
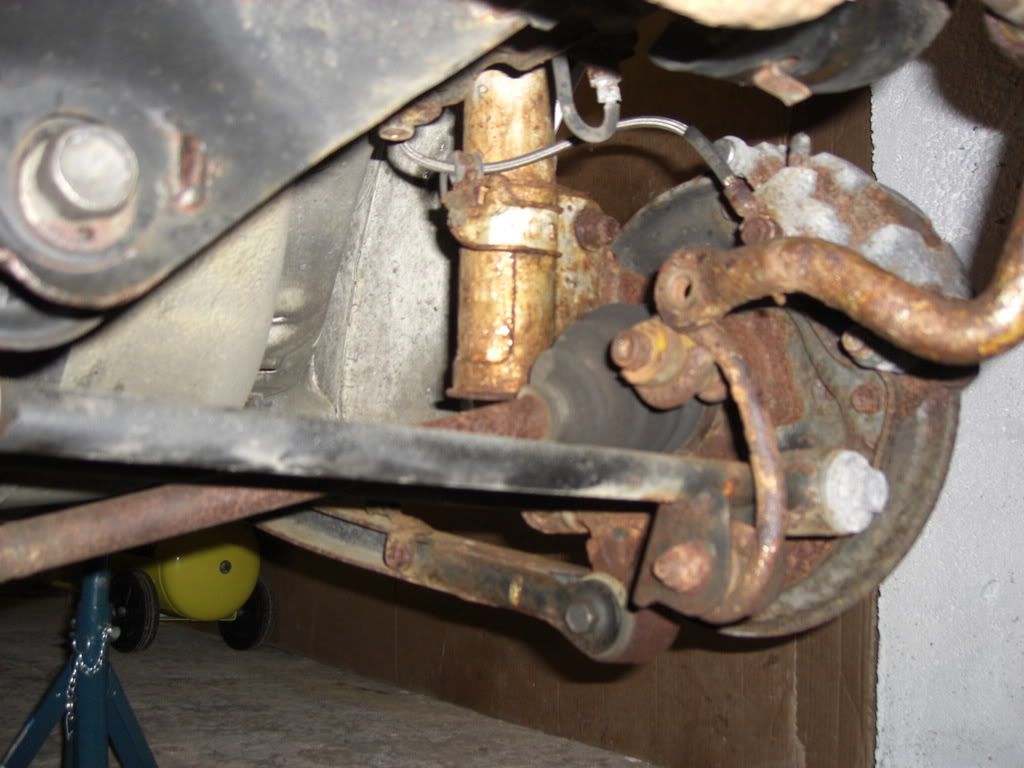
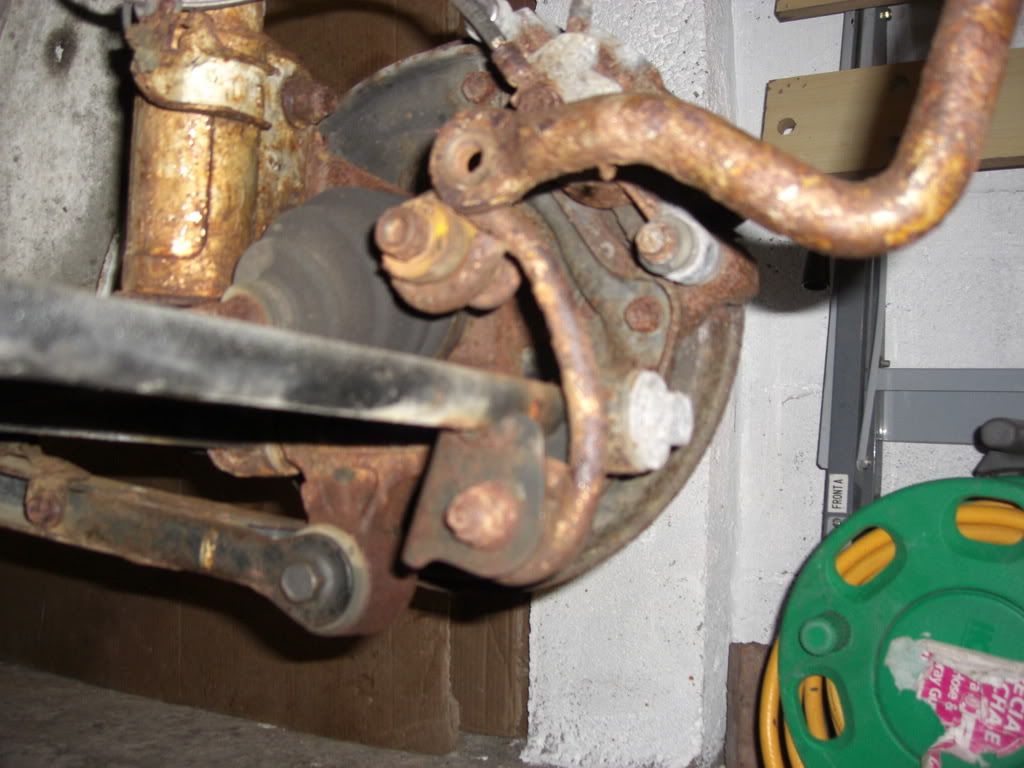
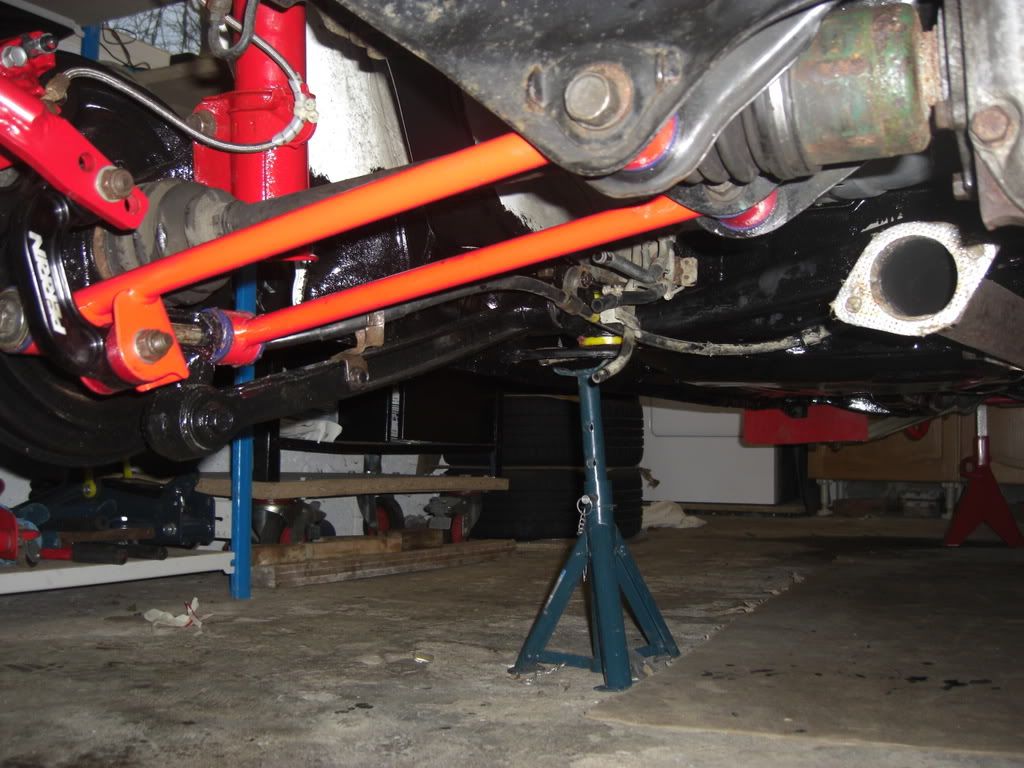
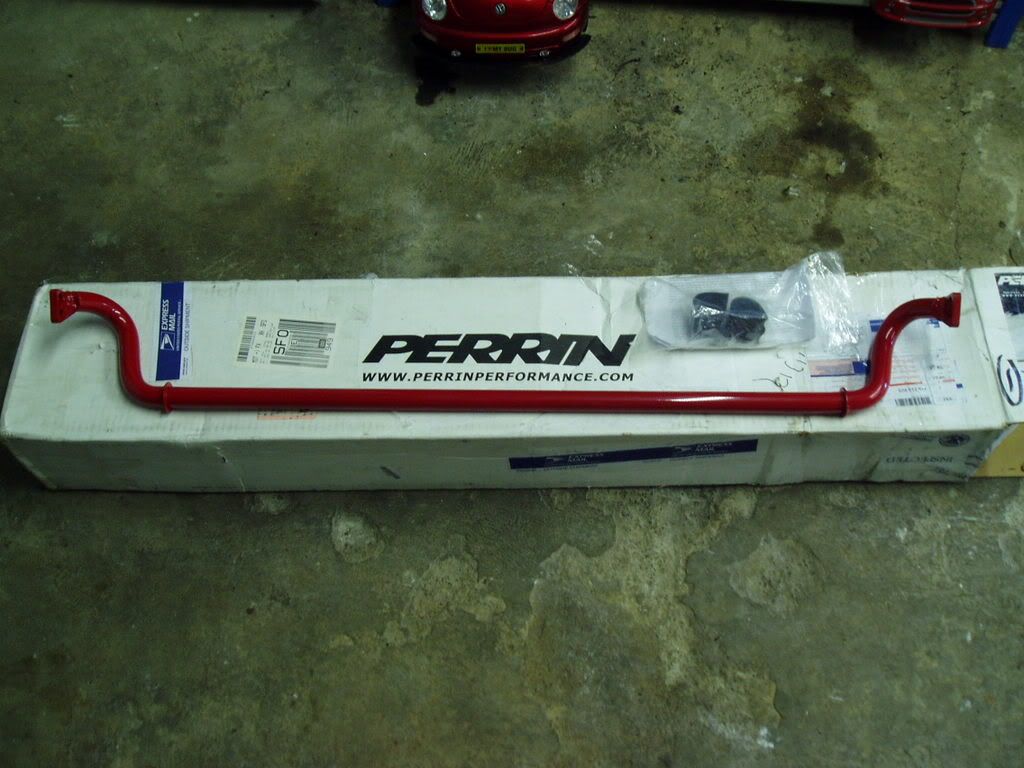
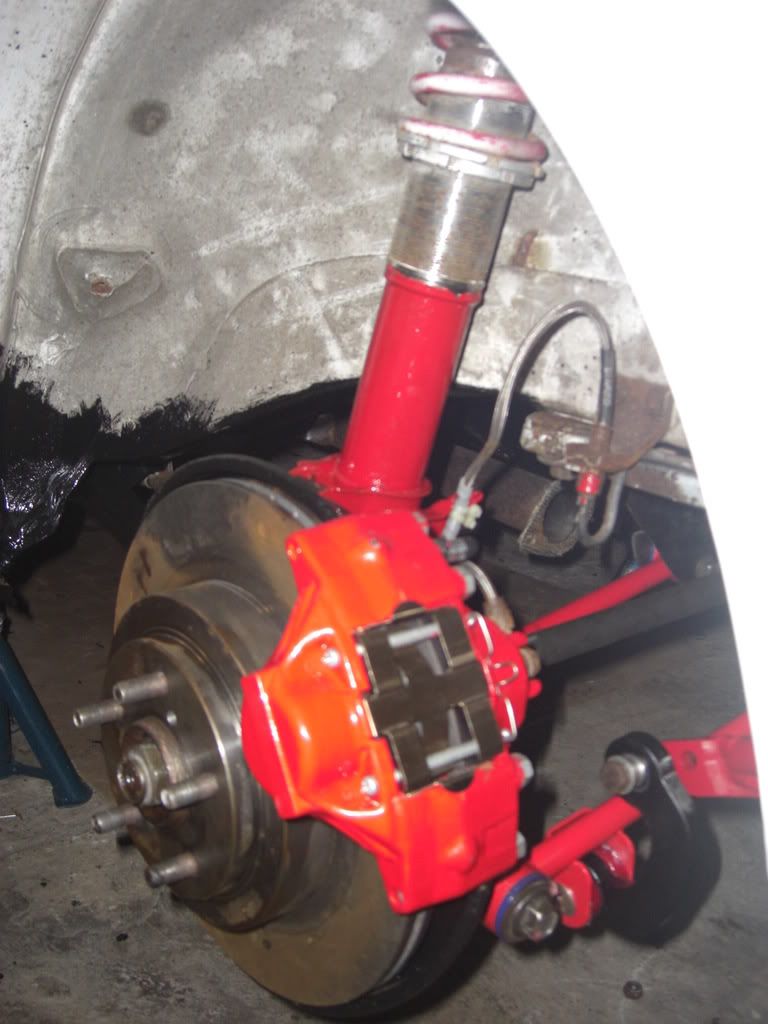
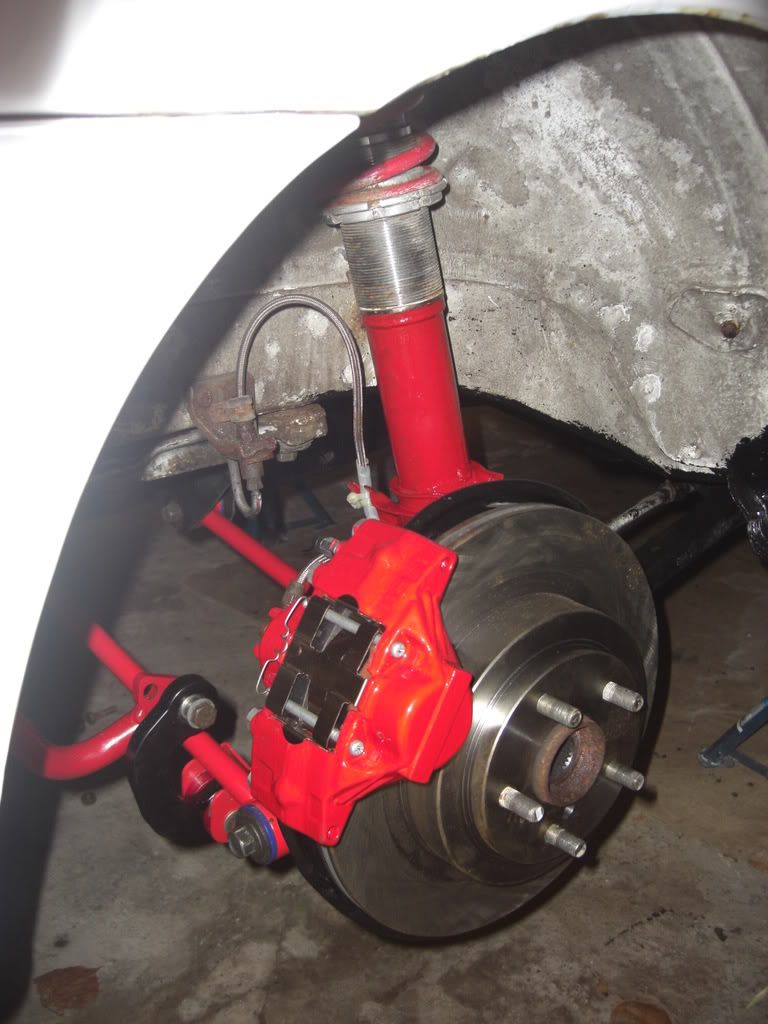
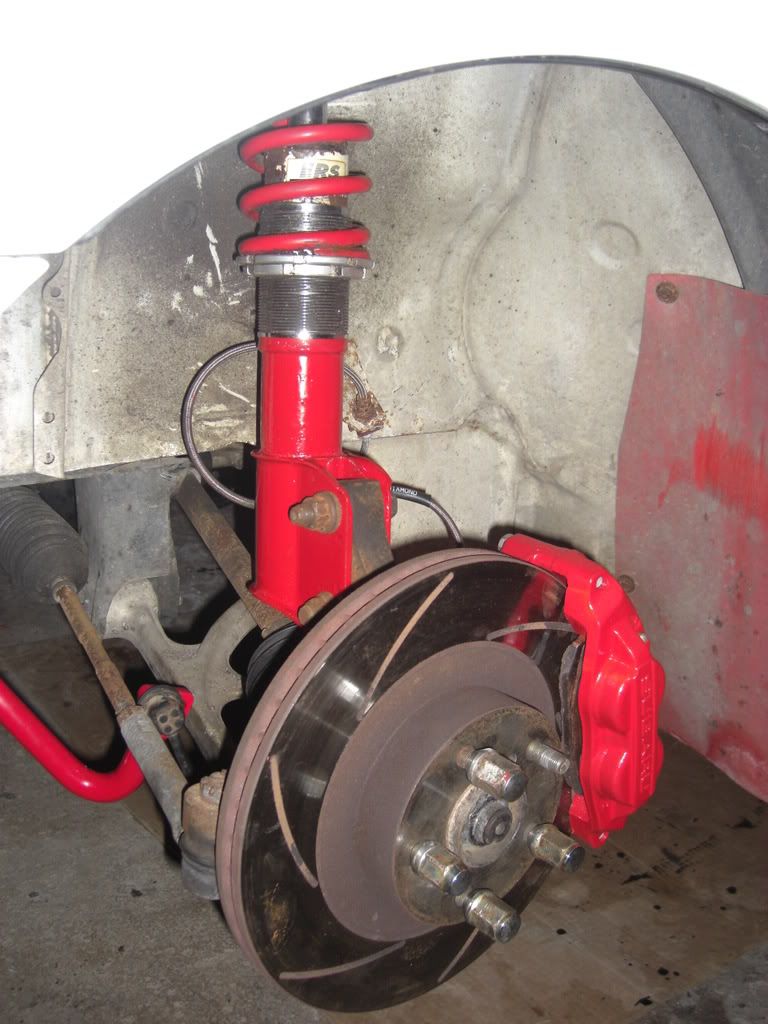
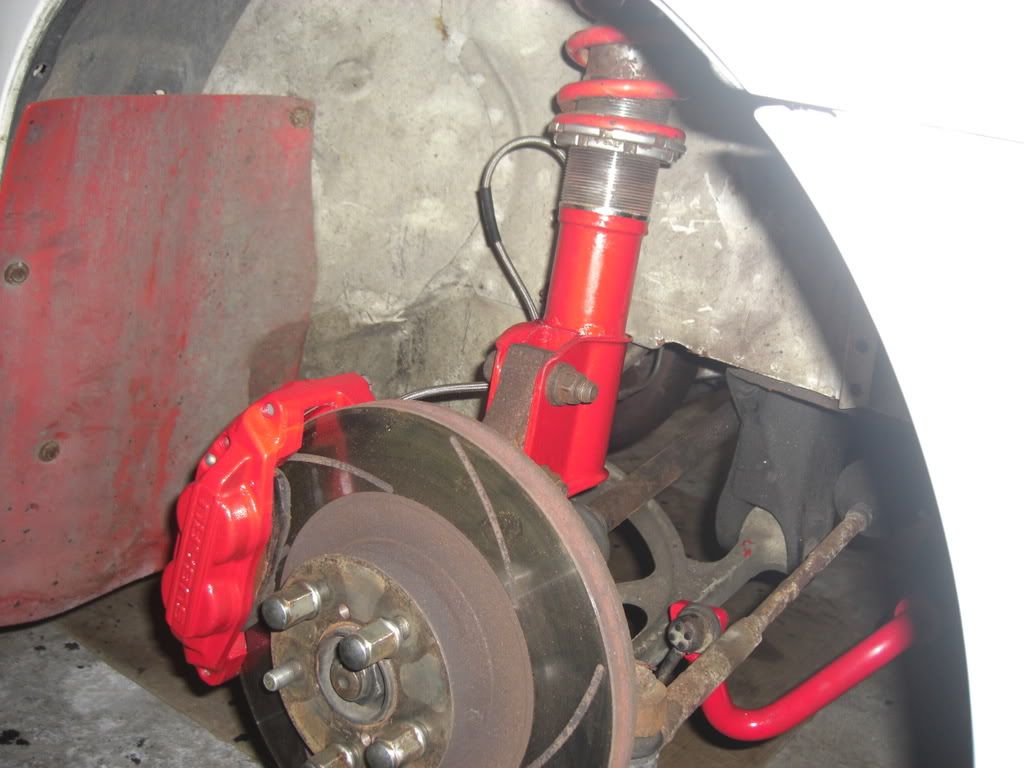
The rear hubs were changed for a pair of late blob eye WRX hubs, all the bushes were replaced with powerflex bushes and the lateral arms powder coated . The roll bars were changed to adjustable Perrin items with the stout mounts at the rear and rear Perrin drop links. The results were better than expected.
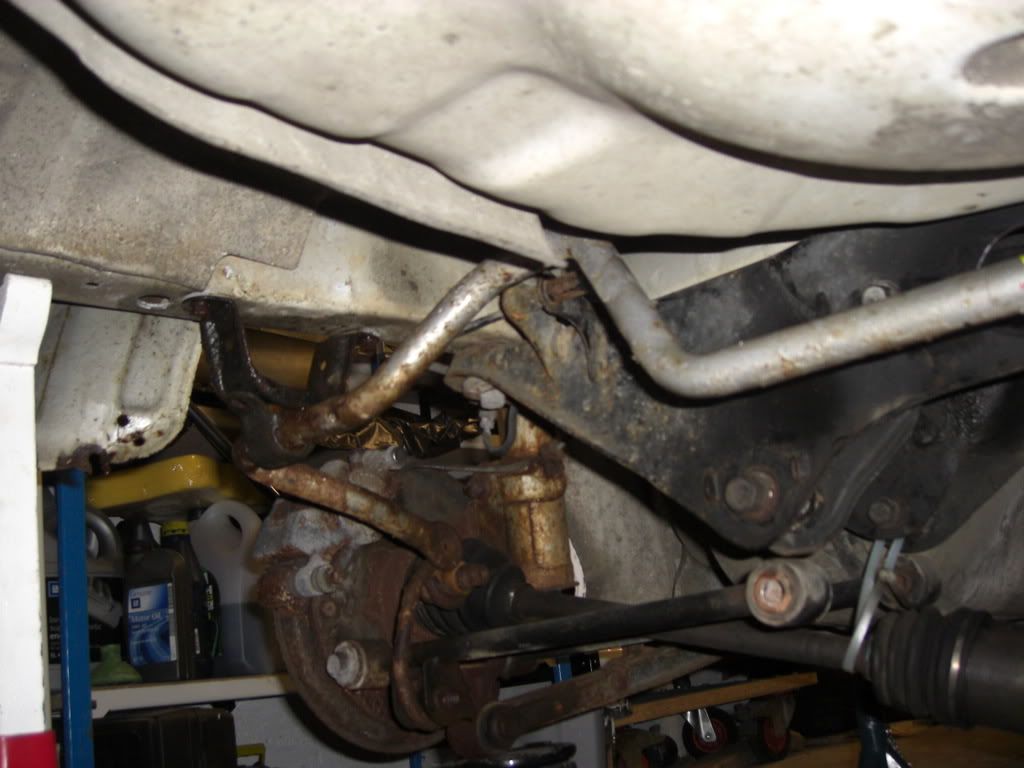
At the front a Perrin adjustable roll bar was fitted along with a set of whiteline steering rack bushes , cheers Geo
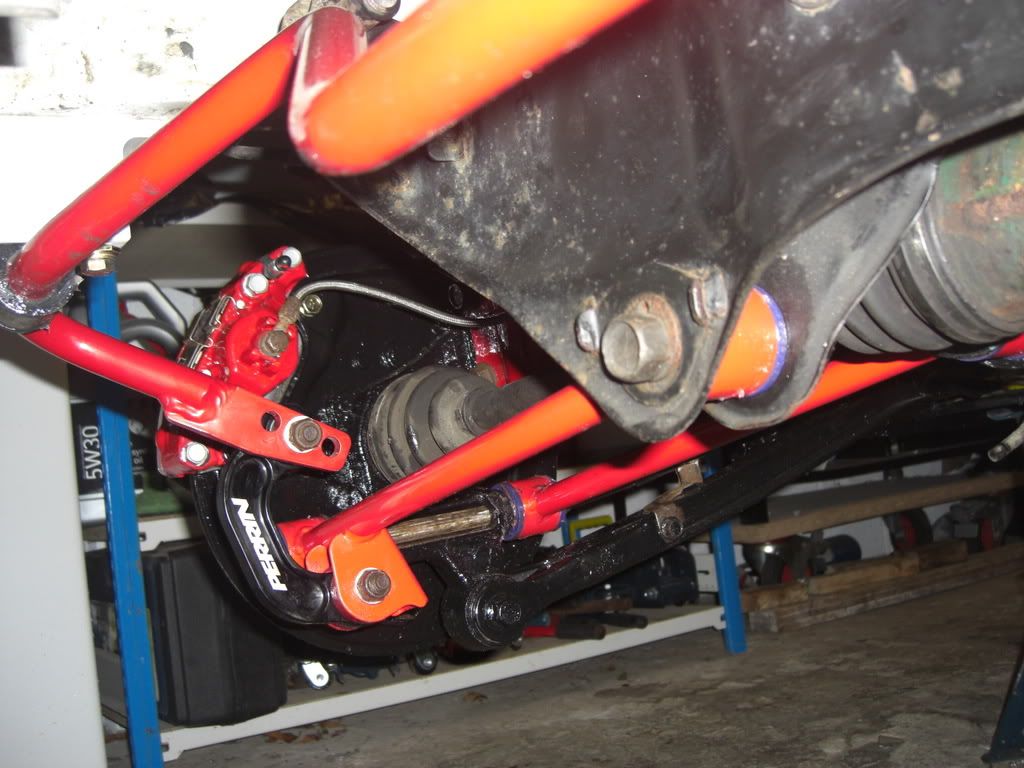
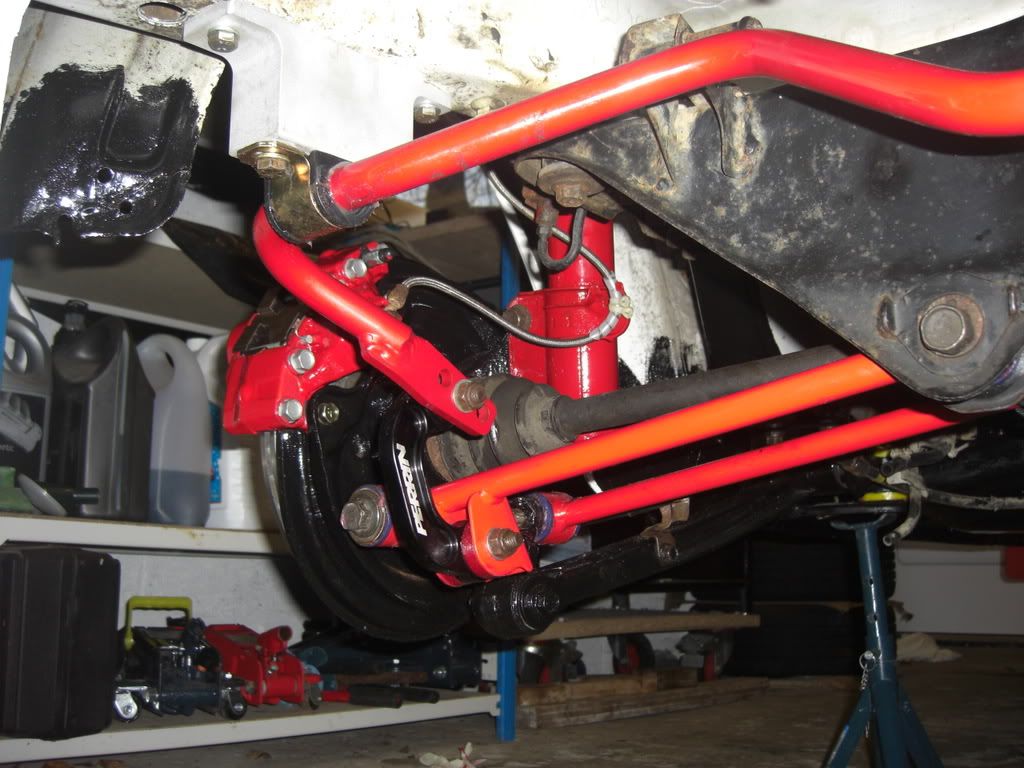
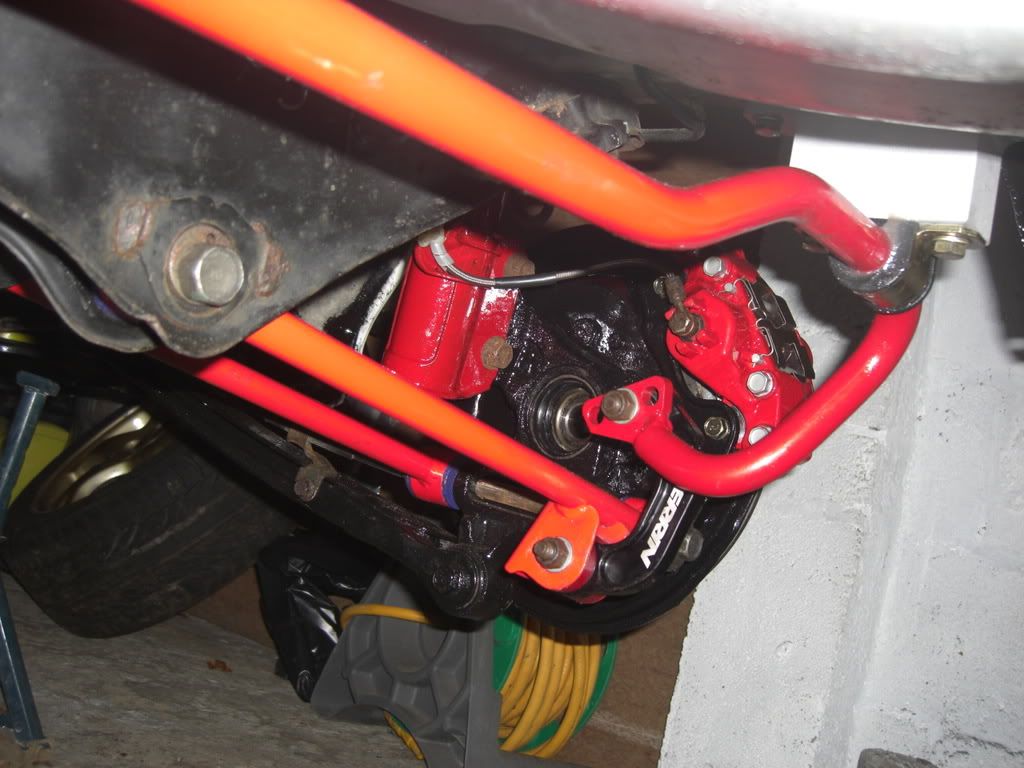
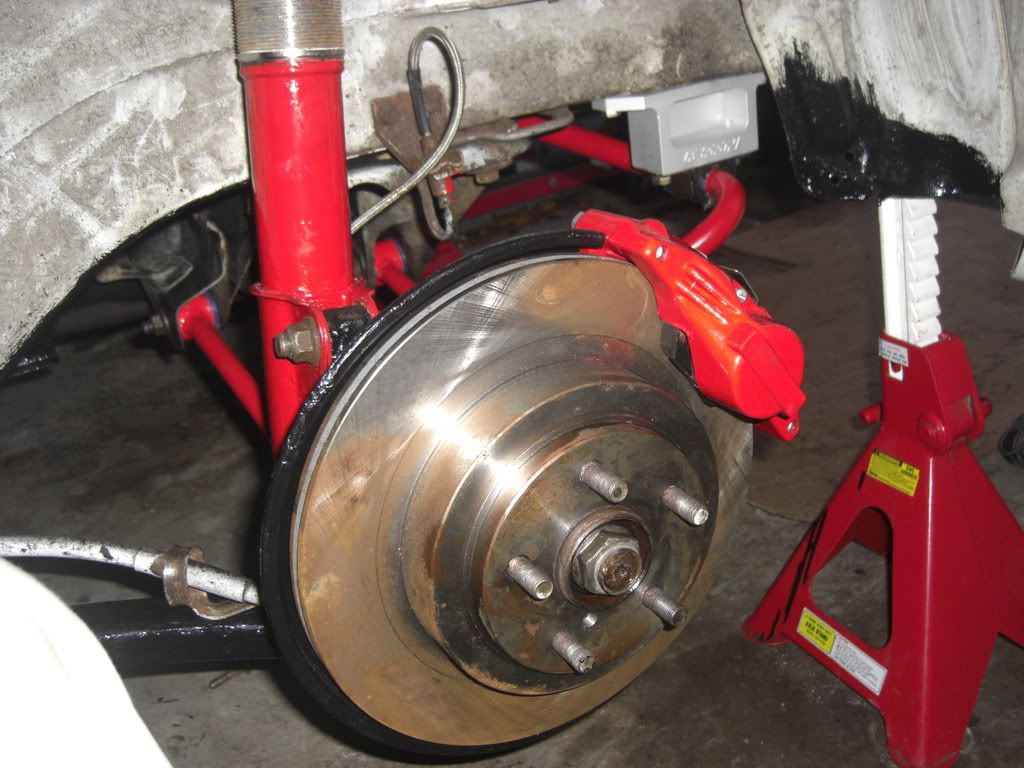
The next item on the list was the brakes so I replaced the front and rear set ups with a set of 4 pot fronts and a brand new set of 2 pots which I got from Alyn at AS Performance who was a great help with advice and supply of parts as things progressed. This was completed with DS2500's all round.
The gear box was next on the agenda, the original RA box had been damaged prior to me purchasing the car so it was removed and on inspection it was pretty much destroyed with the 3rd/4th gear set looking a bit sorry for itself, it looked like the locking nut had come loose allowing the gears to move resulting in a catastrophic failure of the box. To be honest it wasnt a problem as the RA ratio's are not really suited to the use the car was destined for so the box was replaced with an 04 WRX box with a rear plated diff added to complete the gear train.
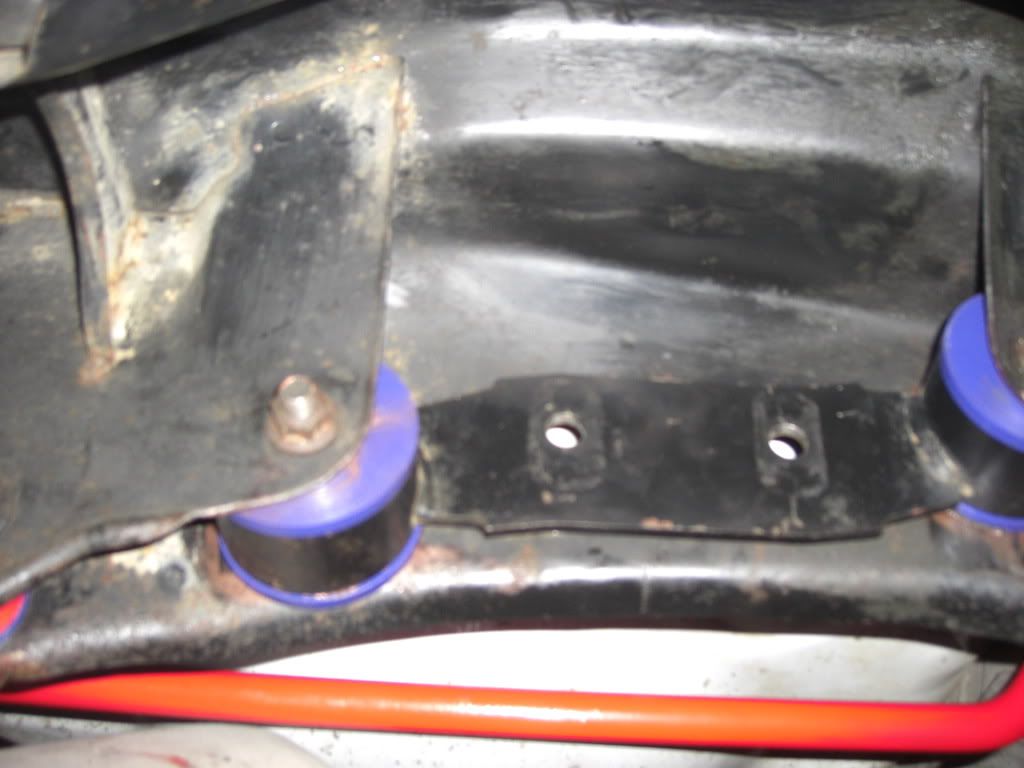
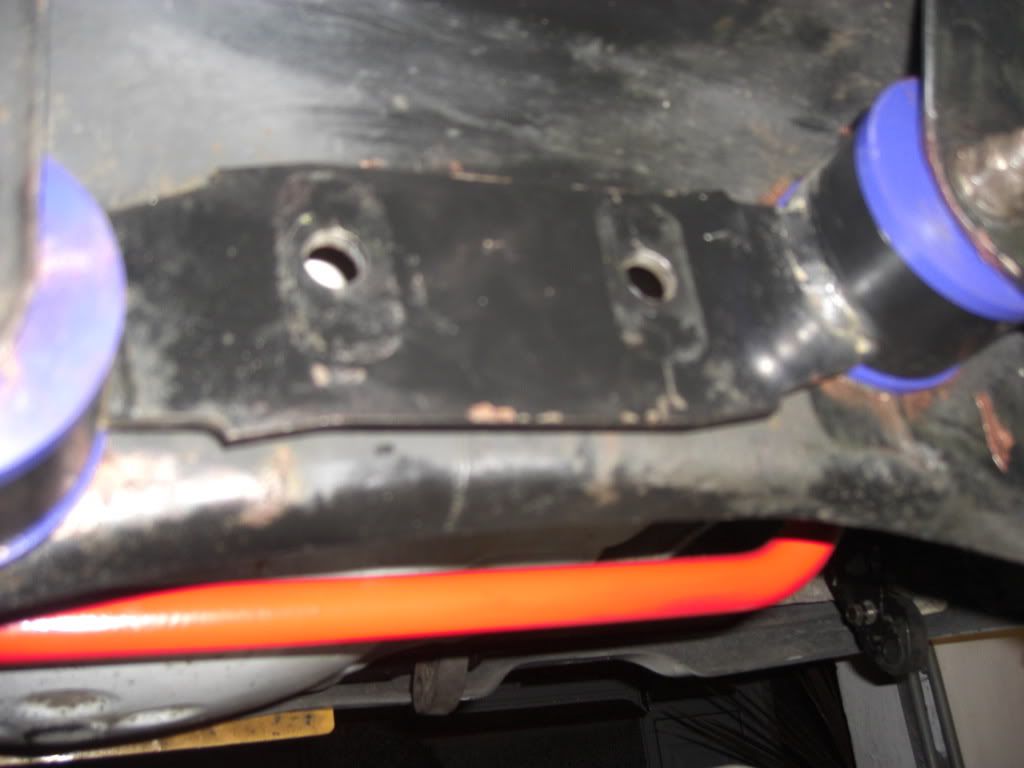
The gear box fit was a doodle but I had issues with rear diff carrier. I had purchased a set of powerflex bushes to stiffen up the carrier but these did not fit.
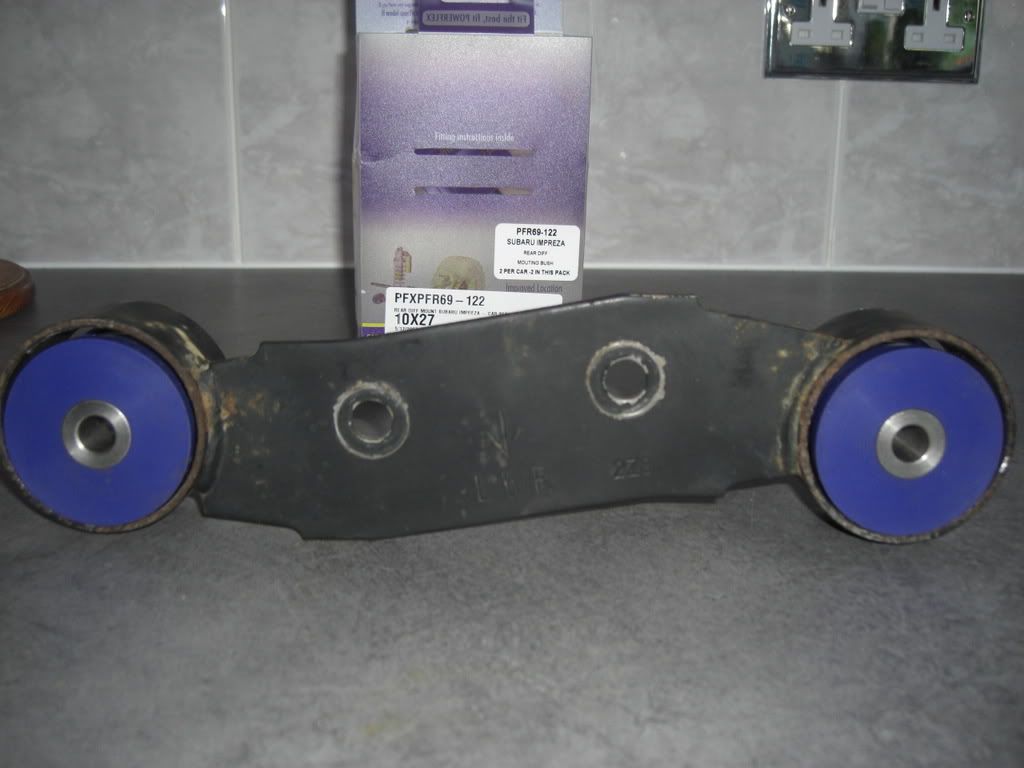
As you can see the bushes are to small. It turned out that the RA and possibly some of the other early imports had a different rear subframe set up for the diff carrier. I phoned Powerflex and spoke to a very helpful chap. Paul Solbe, he informed me that the bush kit I had was the only one they made and they had no idea there was a different kind of carrier. He suggested I send down my carrier and they would see what they could do. A week later and Paul phoned, they had made me a set of bushes and planned to put them into production - result all round. I have a set of stiffened bushes and powerflex have managed to increase the range they have available. So a big thanks to Paul at Powerflex for help above and beyond the call of duty
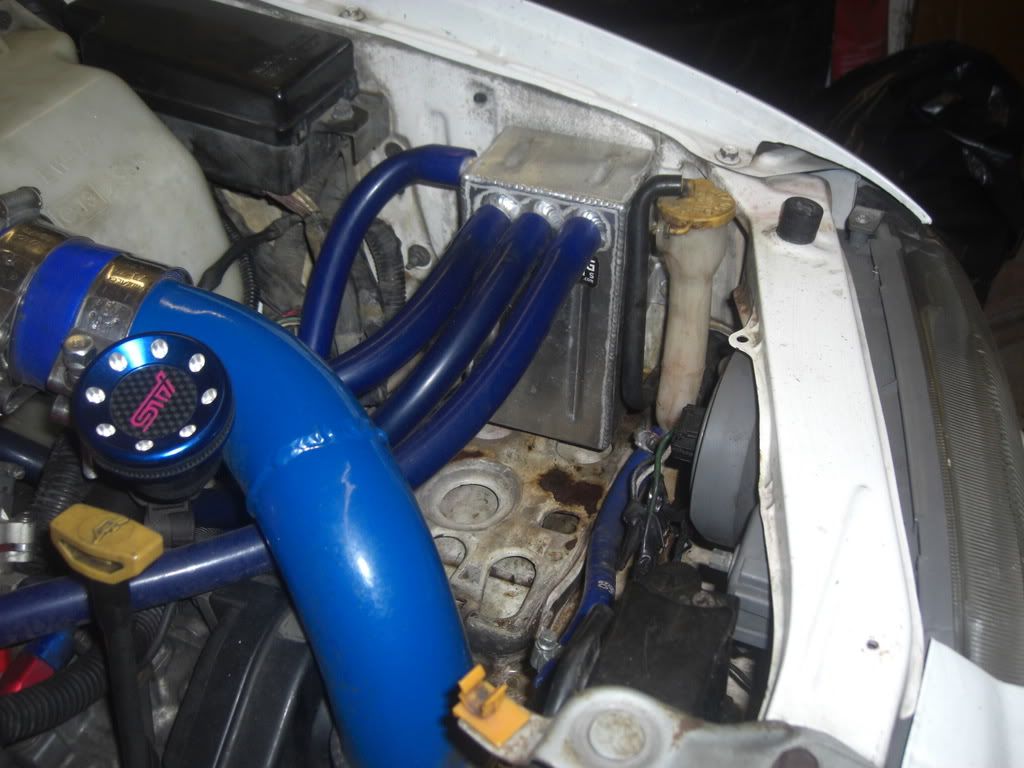
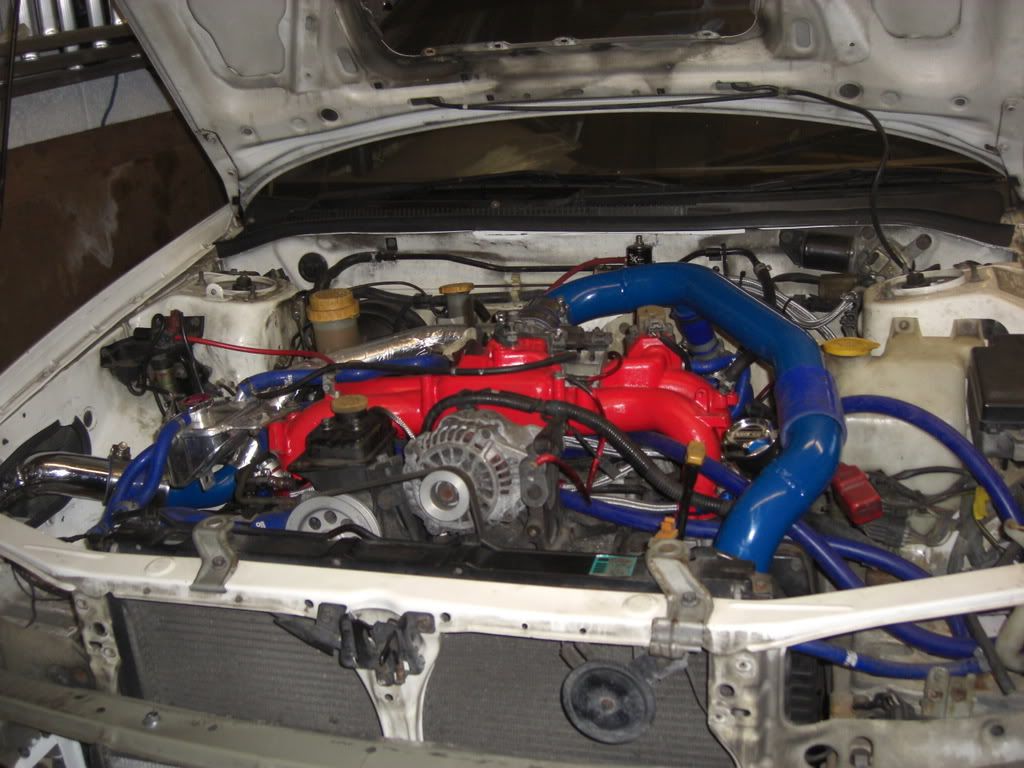
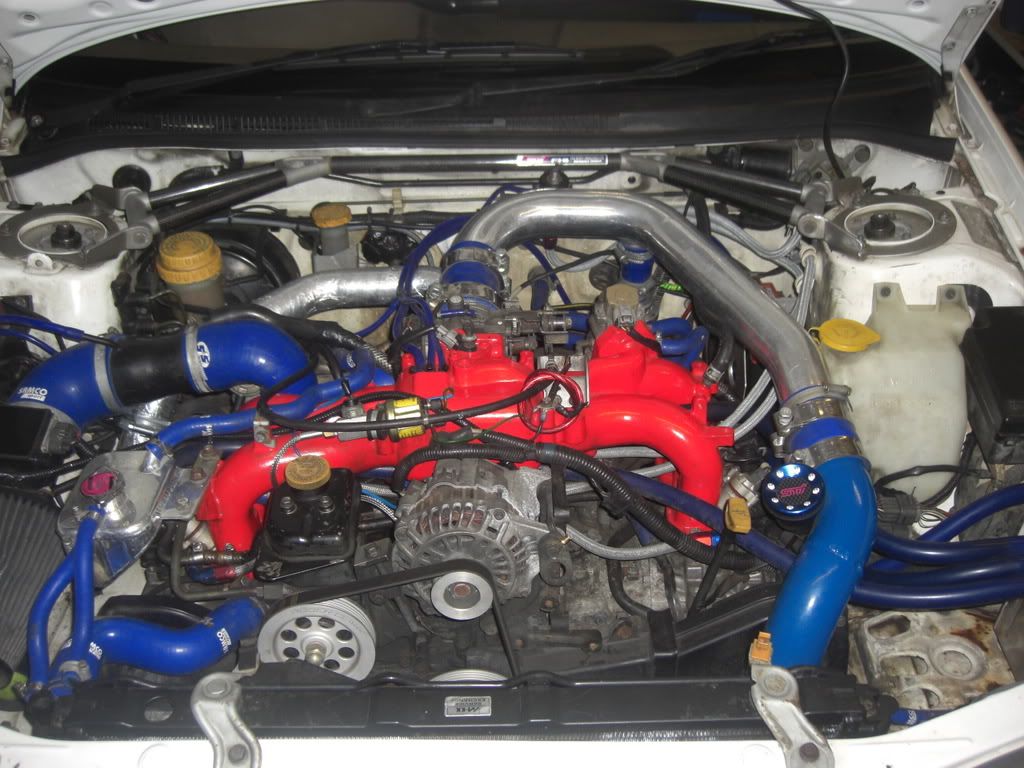
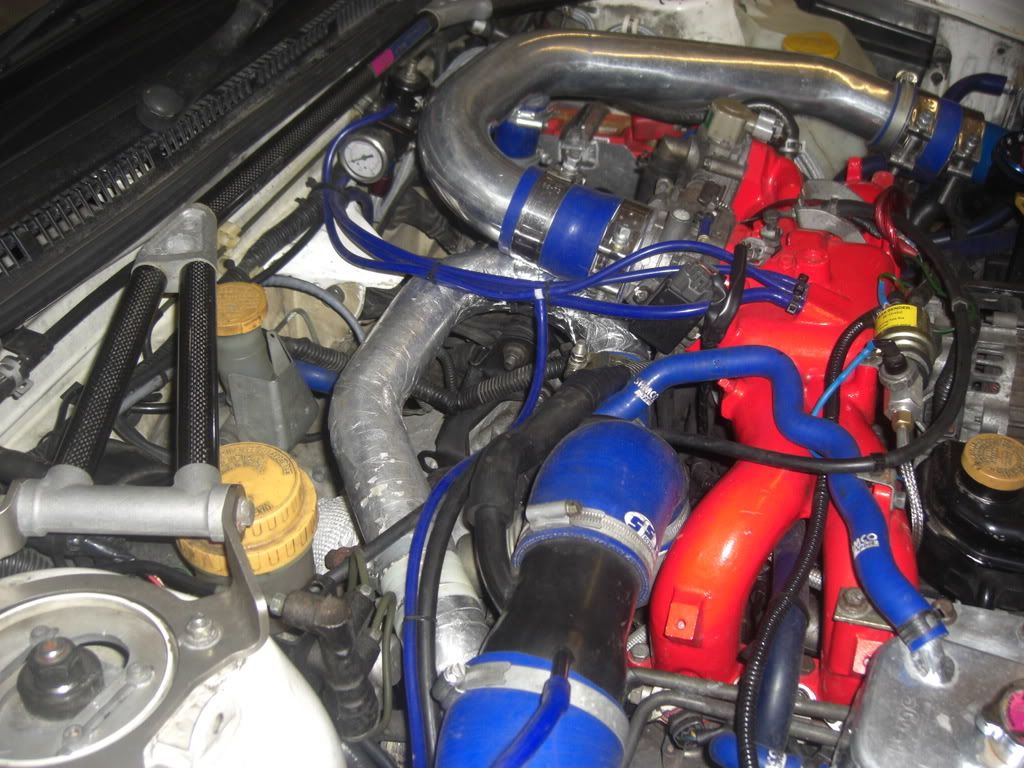
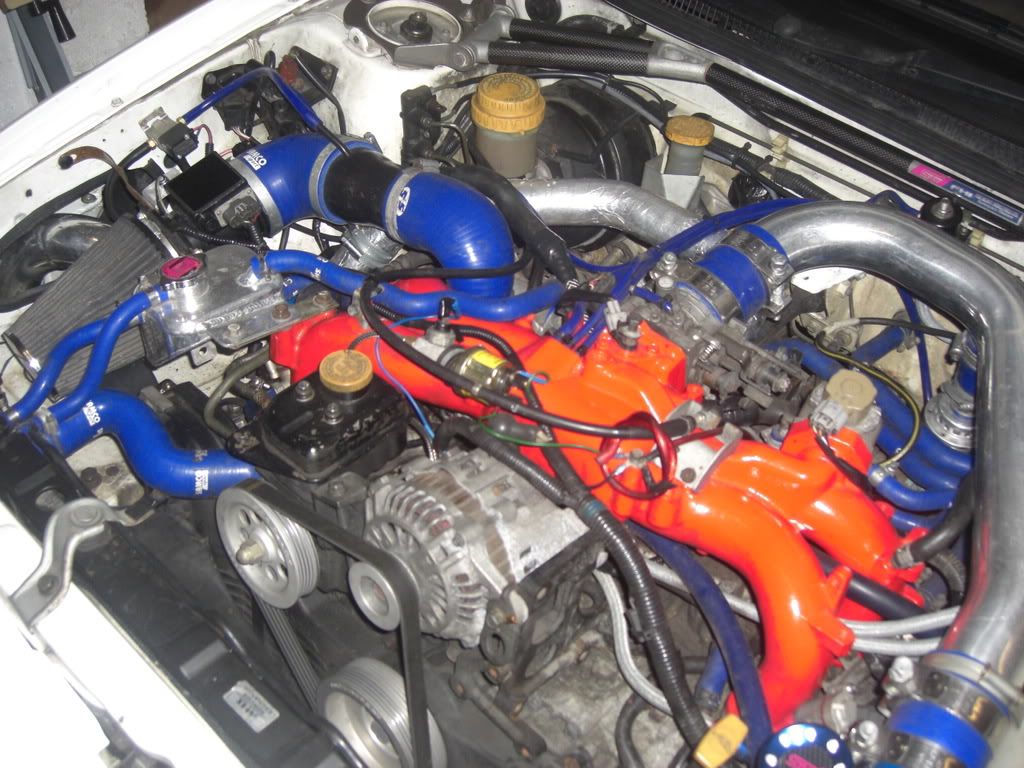
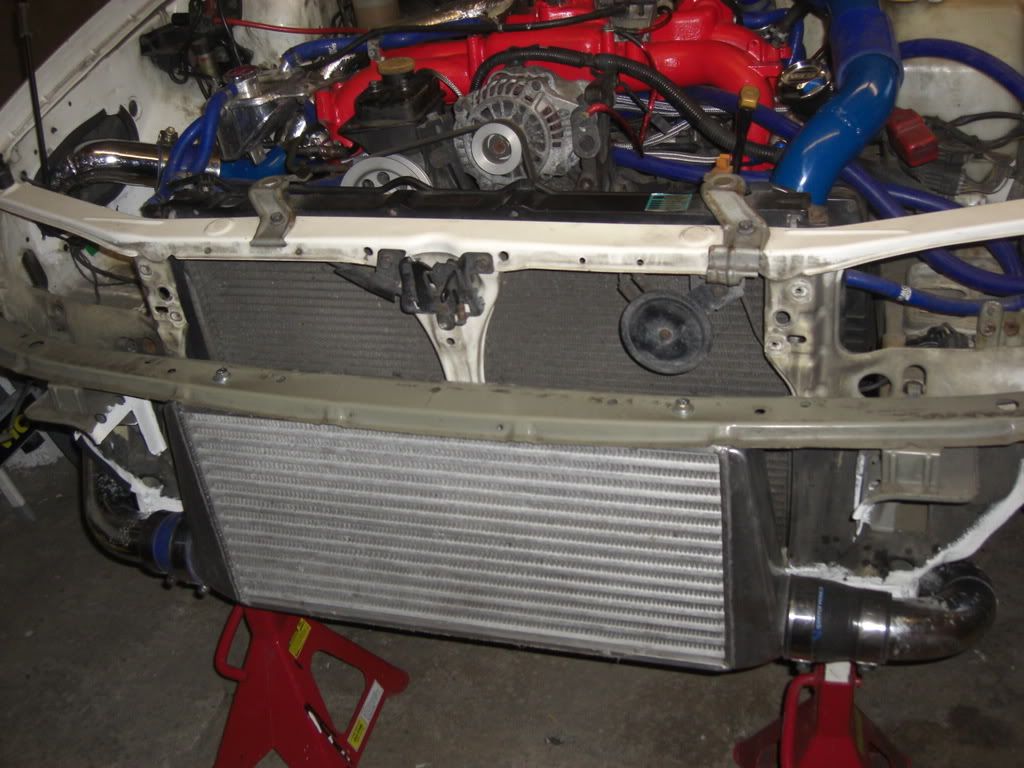
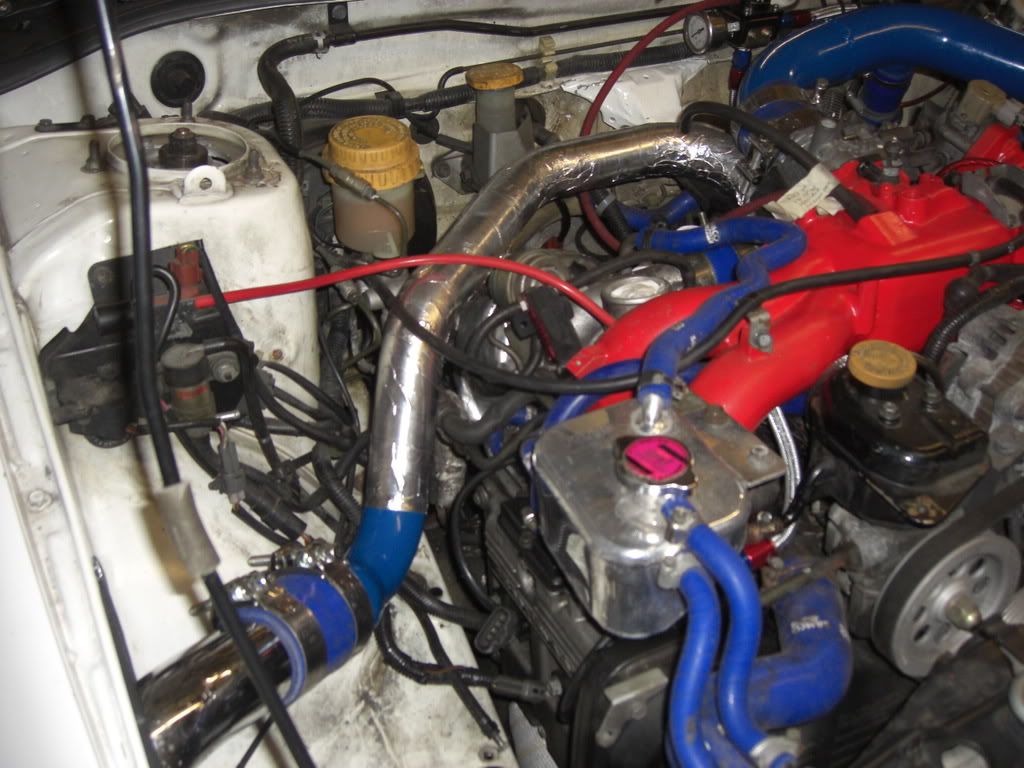
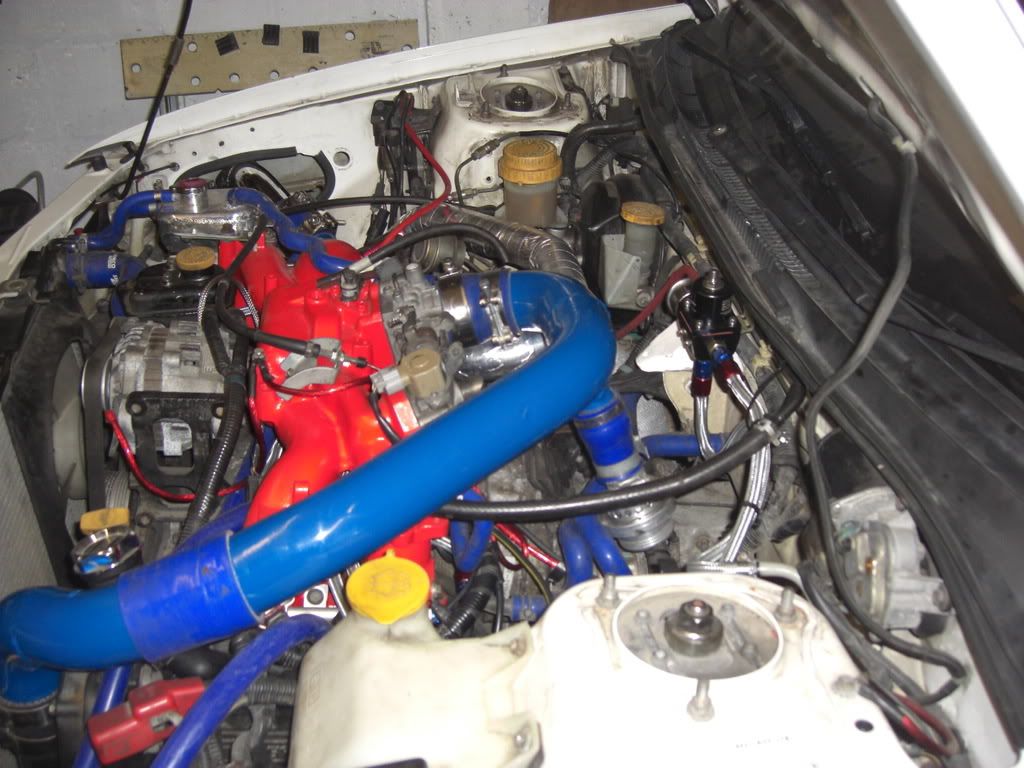
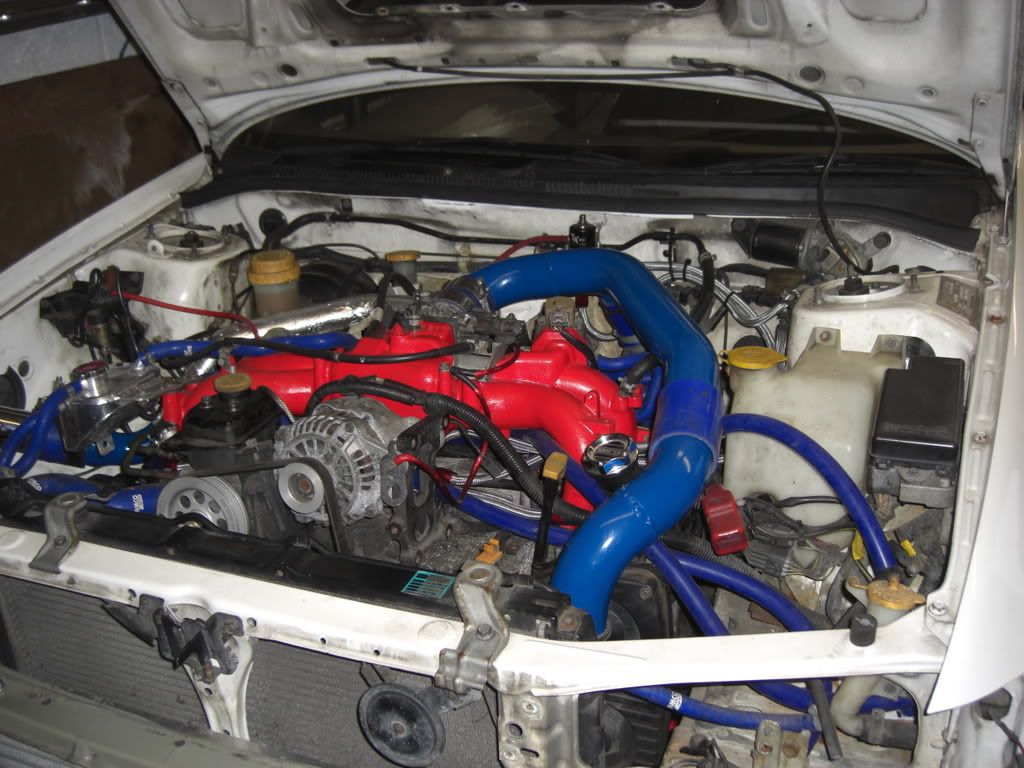
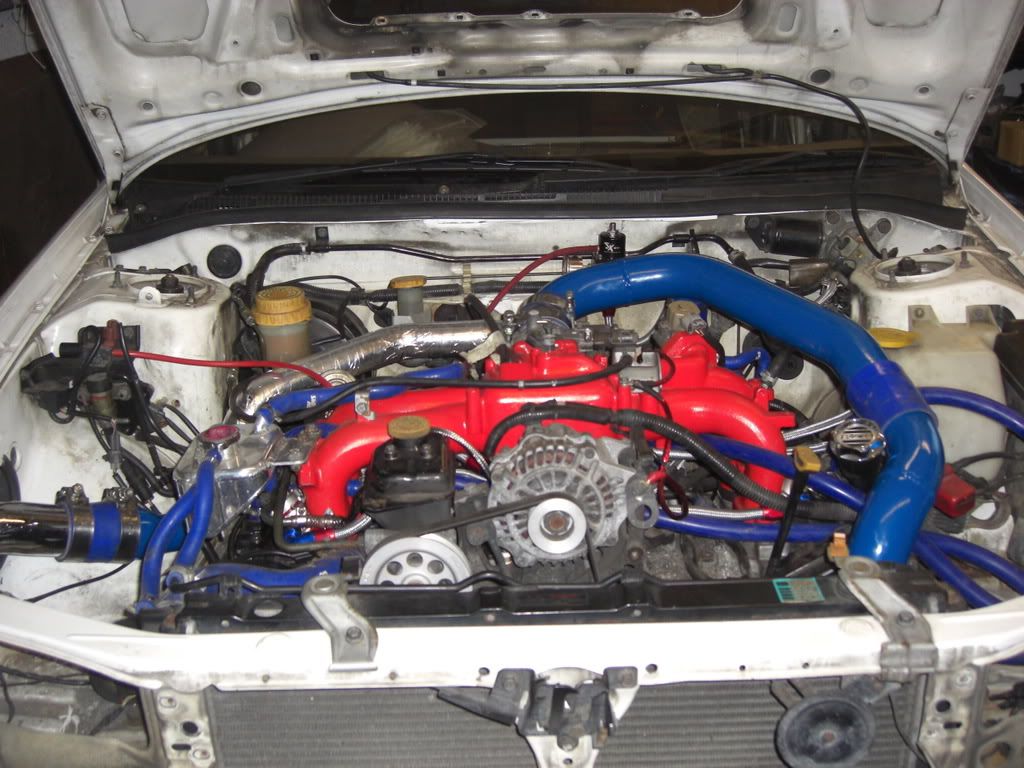
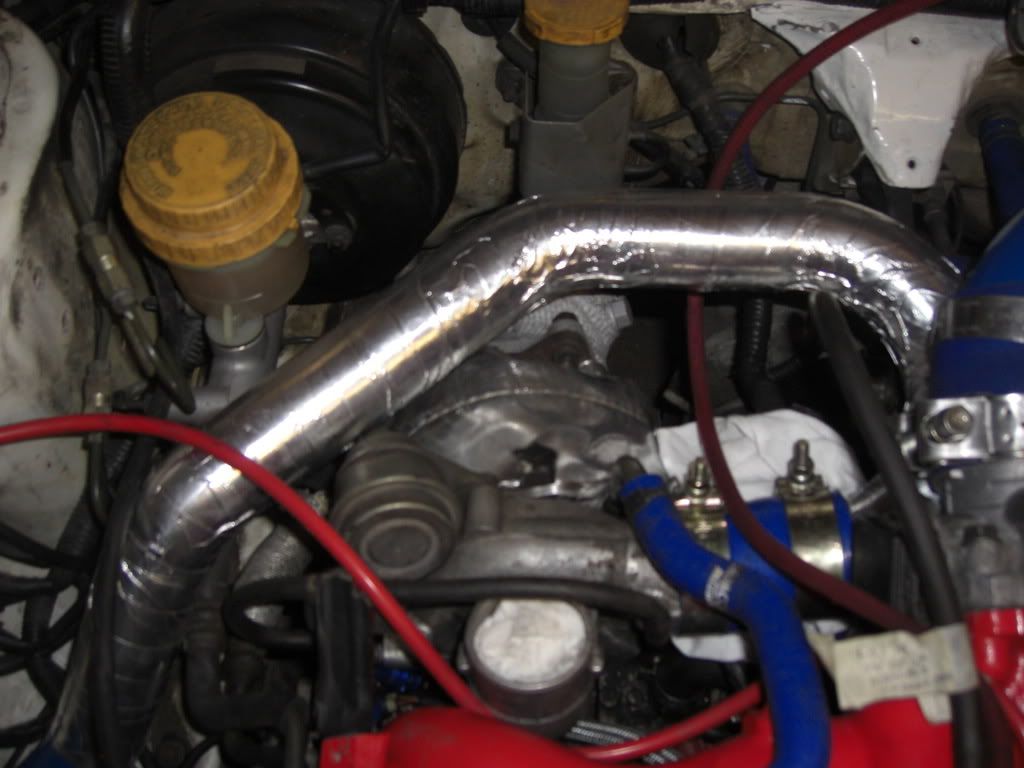
Next it was time to start on the engine bay. First thing on the agenda was removal of the blobeye WRX TMIC and fitting of a hybrid FMIC along with parallel fuel mod and larger injectors. For the fitting of the FMIC I found the following scobynet project thread a great help.
I also fitted a set of tubular headers all wrapped with DEI heat wrap. I also applied DEI self adhesive reflective heat resistant tape to the intercooler pipes running near the Turbo in an attempt to keep the temps down. I also fitted a Turbo blanket again to try and keep the under bonnet temps as low as possible.
http://bbs.scoobynet.com/projects-40/58267...er-project.html
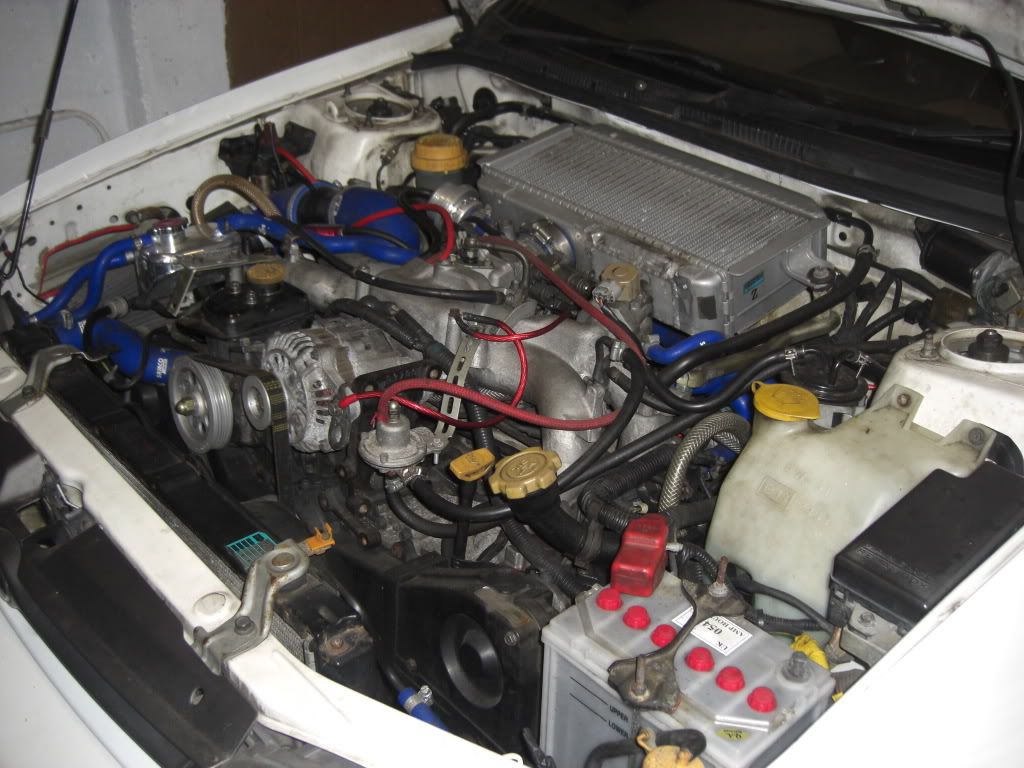
The parallel fuel mod was fairly straight forward but a bit of advice from my subaru oracle made it a lot easier. I used alloy -6 connections throughout the engine fuel feed side although there are some -8 fuel lines and fittings from the tank side. I also had a set of modified fuel rails with -6 fittings to complete the instal correctly. Although properly fitted push fit connections may have been all right I wanted the job done right so decided the more expensive fittings was the only way to go. It was a fairly lengthy process making up the fuel lines and working out where I wanted to run the hoses and where I wanted the FPR. I found the cost of the connectors in rip off UK was horrific so I imported these from the states making a healthy saving and purchased the braided hose from Pirtek. Big thanks to the guys at Pirtek in Paosley who were excellent in ordering the hoses and Mikalor clamps etc and a small discount was also nice as well


and the after first lot of changes
to be cont
-
i have a MY03 STI it has a cat back exhaust and bailey bump valve.
was thinking up pipe and decat to start with (what cat is the best to remove?)
what is a good route to go down and whats it going to cost?
would be more than happy to reach some where between 320-340bhp
any help would be appreciated
No need to change your up-pipe only the WRX's have a cat in the up-pipe and the one fitted to your car is perfectly adequate so keep it and save yourself £100.
Sports cat downpipe, centre cat delete pipe. Remove front silencer replace with straight through pipe and change standard back box for one of your choice. Walbro fuel pump and panel filter and some NGK -7 plugs.
Andy Forest remap ( a must) and away you go - sorted.
 Well to start with
 -
Closer ratio's result in more gear changes which is not always ideal!
-
I imported some spacers from the states which made the job easy, I think you can get them in the UK now might be worth a post on scoobynet ice section to find out.
-
I fitted Infinity reference 6510cs components to the front and Infinity reference 5022i in the rear.
I also added Dynomat sound deadening on all 4 doors. It makes a huge difference. You may need spacer rings to fit the larger speakers in the front and rear I did on my Blobeye.
http://bbs.scoobynet.com/ice-2/298540-ice-...re-posting.html
Pretty much everything you need to know at the above link

-
Gus is right go with Ferrodo DS2500 the standard pads are rubbish. Give Alyn at AS Performance a ring
He will sort you out a very competative rate and knows Subaru's inside out. I use the DS2500's on my road car and Sprint/hillclimb RA and they work very well
If you give Alyn a ring tell him I suggested giving him a bell he would also offer advice on what is best for your specific needs
 Dont pay someone to fit them its a doddle and can be done yourself in about half an hour.
 -
What drive shafts and diff are you thinking of using to obtain the extra track at the rear?
-
IMO pump is a waste of time at standard power levels on a newish car !
I was advised to leave the standard pump in by someone with a much bigger brain than me

-
lol, I doubt that would even fit up the hill at Doune!
John - if I can't do it next year then hopefully the year after that. Not sure what in yet. Looking at a cheap tin top to start with to see if I like it. Thinking an EK Civic might be a fun place to start to see if it tickles me in the right places.
Need to learn a bit more spannering skills - oh and progress my career to fund it!
Until then I will keep snapping as they're always great weekends and the paddock banter is good.
Tank may be a good idea to make a wide enough path for John to get up in the new car dont think his attempts at modding the course with the red car were successfull enough
I did try to mod the first corner for him but that wasnt successful either. 
Cracking shots again and thanks for the print
-
Thanks for the help looking for the keys guys, I owe you all a few beers....
Must admit I had loads of fun lifting a gearbox out of my boot twice looking for them
Andy nice to meet you, car was looking really good
Nice to meet a few faces from on here that I hadnt met before. Currently look like a panda maybe wearing shades all day was a bad idea

-
Is it an ECUtec ecu? If so could it have reverted to the low boost map if the battery was disconnected.
-
Thanks John, I'll have to take you up on that offer at some point
Are you sure you want to do that? If you do then make sure your are in mine first dont want my seats stained after you have been out with psycho bob
-
Nobody get lost?
Not looking at any white Subarus in particular.
I decided my time was rubbish and wanted to check out the off road capabilities of the car, found it handles not to bad on the grass and steers round them big hay bails a treat
Cracking pics as Usual John the first one is a cracker

-
.
In the future I think each specific application will see an appropriate Turbo setup
 john
john Cool a future Turbo swap shop
-
Well just off the phone to Stevie W, not long back from the man him self Andy F just had the car remapped and well im very impressed with the figures .... they will follow shortly he he .. cant stop smilling

There is defo going to be a PB broke this year
Just like to thank Stevie Whitson of SW Motorsport for his brilliant engineering and patience with me lol he has made the car what it is today ??
And to Andy F for his magic.
Much Appreciated fellows
Roll on Crail he he
Put it on a track or a hill climb thats what its for not a straight line

P1 Style Splitter
in Scottish Scoobies
Posted
No John going very well he picked up a small scratch on a panel which will polish out. I decided that it was boring on the tarmac after all everyone else was off rallying today